Version 3.5
Download ADX Editor: Click Here
ADVX Editor is SCT and Bullydog’s calibration editor and the successor to Advantage III. Use it to open a stock calibration or a saved tune, find and change its values, apply value files, compare tunes, and send the finished tune to a customer or program it into a device. This illustrated quick start walks you through the main tasks in 19 steps.
Contents
- Start ADVX Editor
- The window at a glance
- The toolbar and menus
- Open a calibration
- Find a parameter
- Read the Information Panel and History
- The editors
- Change values
- Change a table's axes (normalizers)
- Load a value file
- Tick items and save values
- Compare two tunes
- Work with two tunes
- Tuning Tools
- Tools, Options and View
- Send a tune to a customer
- Program a device
- Save and close
- Tips and troubleshooting
Before you begin
Six rules for day one
- Save a stock tune under a new name. Use Save Tune As and give the copy a new name, so the stock file stays as it is (step 18).
- Save before you use Close All Tunes. File → Close All Tunes closes every open tune at once. Save any tune you want to keep first (step 18).
- Select a block in one press-and-drag. Press on the first cell and drag to the last cell in one movement. Do not click a cell and then press it again straight away (step 8).
- Check the folder before you save a value file. Save dialogs open in the last folder you used. Keep your own files outside the Value Files library (step 11).
- Only load value files made for your vehicle and calibration. ADVX Editor applies a value file to whatever tune is open. Afterwards, check the result: look for red and blue values, or compare the tune against Stock (step 10).
- In Dual Edit, type in the left-hand grid. To change the other tune, switch to its tab (step 13).
Key terms
| Term | Meaning |
|---|---|
| Tune / calibration | A calibration you open and edit in ADVX Editor: a stock calibration opened by its identifier, or a tune file (.atf) you have saved. Each open tune has its own tab in Tune View. |
| Identifier | The code that tells ADVX Editor which stock calibration to open. For Ford, enter the strategy, box code or software part number. For Cummins, enter the 10-character ECU part number (Advantage III called it the Processor Code). For GM, enter the VIN or open the SUL file, depending on the model. |
| Strategy | The 7-character code of a Ford calibration, for example FSMK8FC. Read it from the vehicle with your SCT or BullyDog device (Vehicle Info). The status bar shows the strategy of the open tune. |
| Box code | The 3- or 4-character code on the Ford PCM label, also called the tear tag or catch code. Some codes are used on more than one platform, so on an OBD-II vehicle confirm the strategy as well. |
| Software part number | The Ford ECU software part number, with 14C204 in the middle, for example RR3A-14C204-BAF. Used mostly on 2015 and later vehicles. |
| Scalar | An item with a single value. |
| Table | Values laid out in rows and columns, over an X axis (columns) and a Y axis (rows). |
| Normalizer (breakpoints) | An XNorm (columns) or YNorm (rows) item that sets a table's axis. Its left column lists the breakpoints, which appear as the table's headings. Its right column gives each breakpoint's position on the axis, counting from 0. One normalizer can serve several tables (step 9). |
| Value file | A file (.mvf) holding a set of item values. You can save every value, only the changed values or only the ticked items to a value file, then apply it to a tune in one step. |
| Stock | The calibration's original values. A tune keeps them, so ADVX Editor shows a changed value in red (higher than stock) or blue (lower than stock), and Compare Tunes can compare a tune against Stock. |
| Dongle | Your dongle serial number appears as Serial in the status bar at the bottom left. Professional, Calibrator and RD are user levels set by your dongle (step 15). |
| Burns | The burn count for your dongle, shown in the status bar at the bottom right. This resets with every application relaunch. |
| Customer file | A tune packaged for one customer's device: a customer export file (.cef) to send by e-mail, a Bully Dog GT export, or a tune sent through ADVX Editor Cloud. Only the device with the serial number you enter can load that .cef file (step 16). |
| Livelink tag | The Livelink datalogging parameter named in an item's description, after "Livelink-". Log that parameter in Livelink Gen2 to see the item at work in the vehicle. |
1. Start ADVX Editor
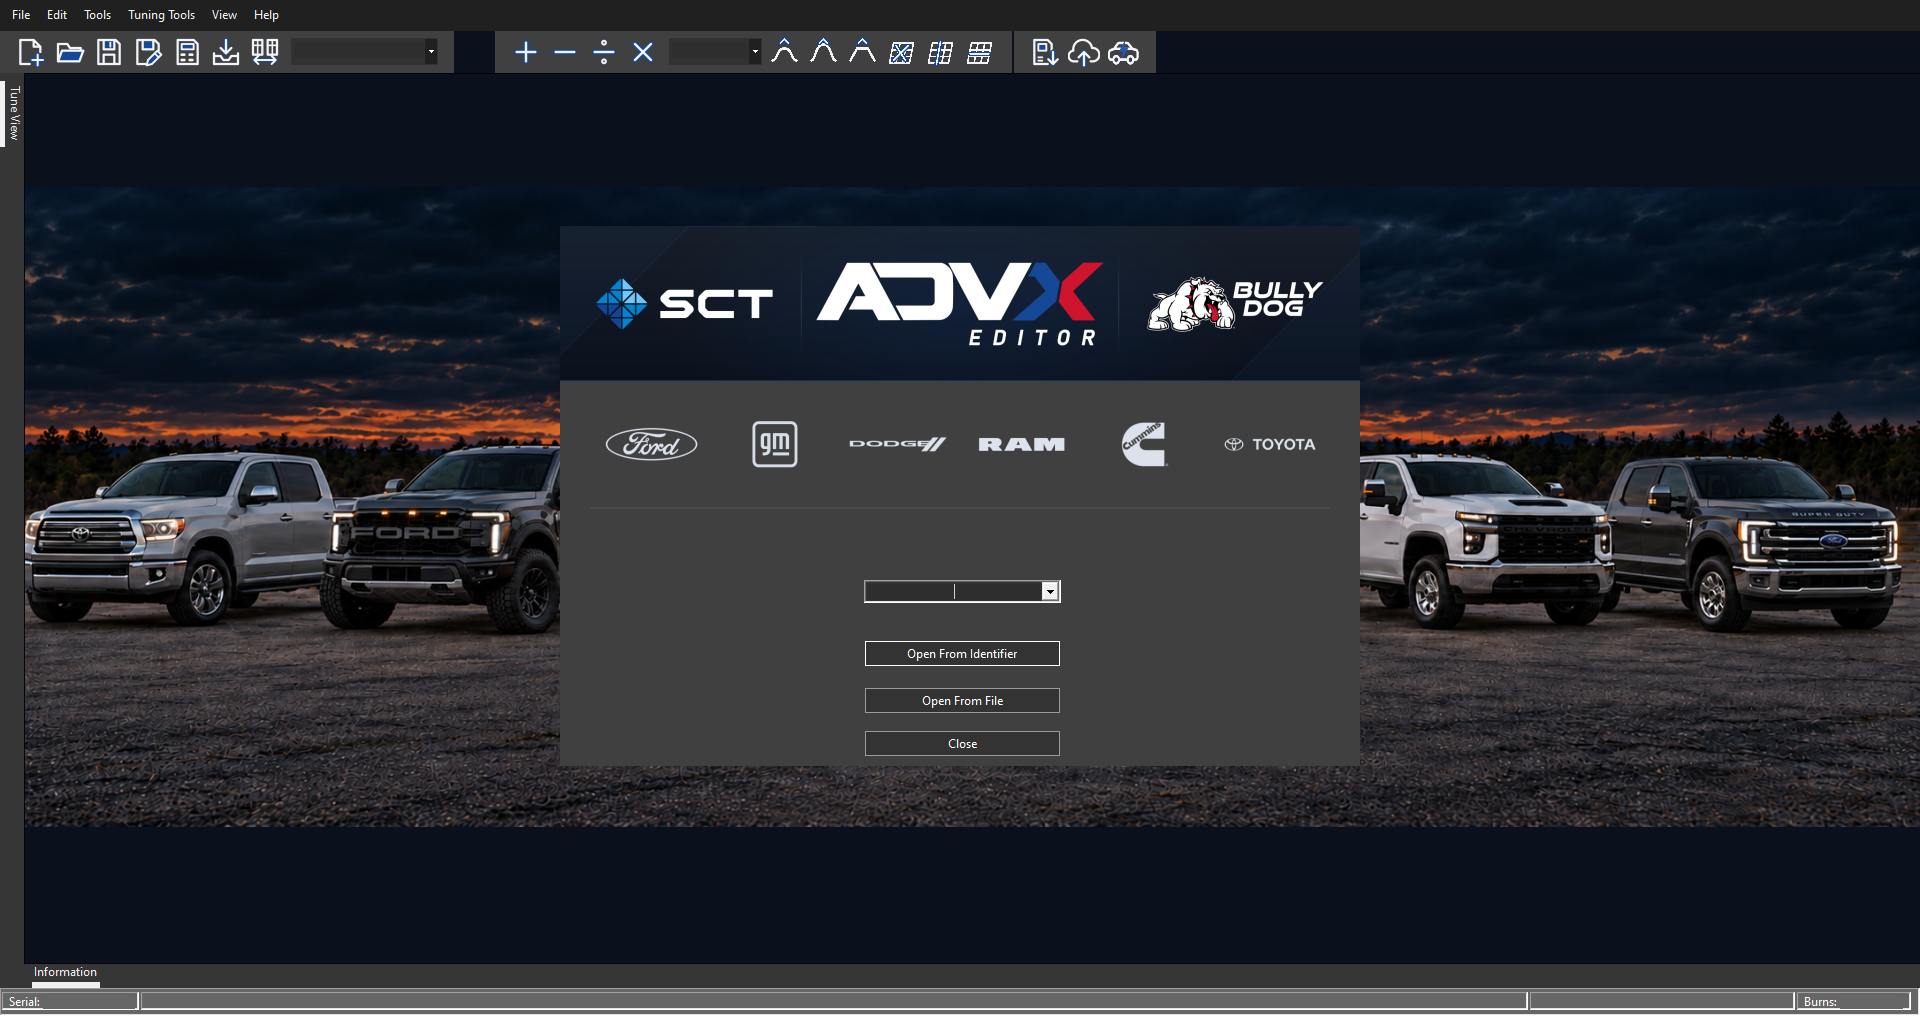 The welcome screen over the main window, with the Tune View and Information tabs on the window edges
Run ADVXEditor.exe from the ADVX Editor program folder you have downloaded. You do not need to run it as administrator. The program will load for a moment. Then the main window opens with the welcome screen in the middle.
Use the welcome screen to choose a calibration:
- Identifier box. Type a calibration identifier or choose one from the drop-down. The drop-down lists identifiers you have opened before. Step 4 explains what to enter.
- Open From Identifier. Opens the stock calibration for the identifier in the box selected above.
- Open From File. Opens a tune file or SUL file you have previously saved.
- Close. Closes the welcome screen and leaves you in the main window.
To bring the welcome screen back, press New Tune (button 1 in the top tool bar) or choose File → New Tune.
Panels on the window edges. The Tune View and Information panels can start as tabs on the window edges, as in the picture: Tune View on the left edge and Information along the bottom. Click a tab to open its panel. To keep the panel open, click the pin at its top right.
ADVX Editor opens full screen while Startup in Full Screen (Maximized) is ticked in Tools → Options (step 15).
2. The window at a glance
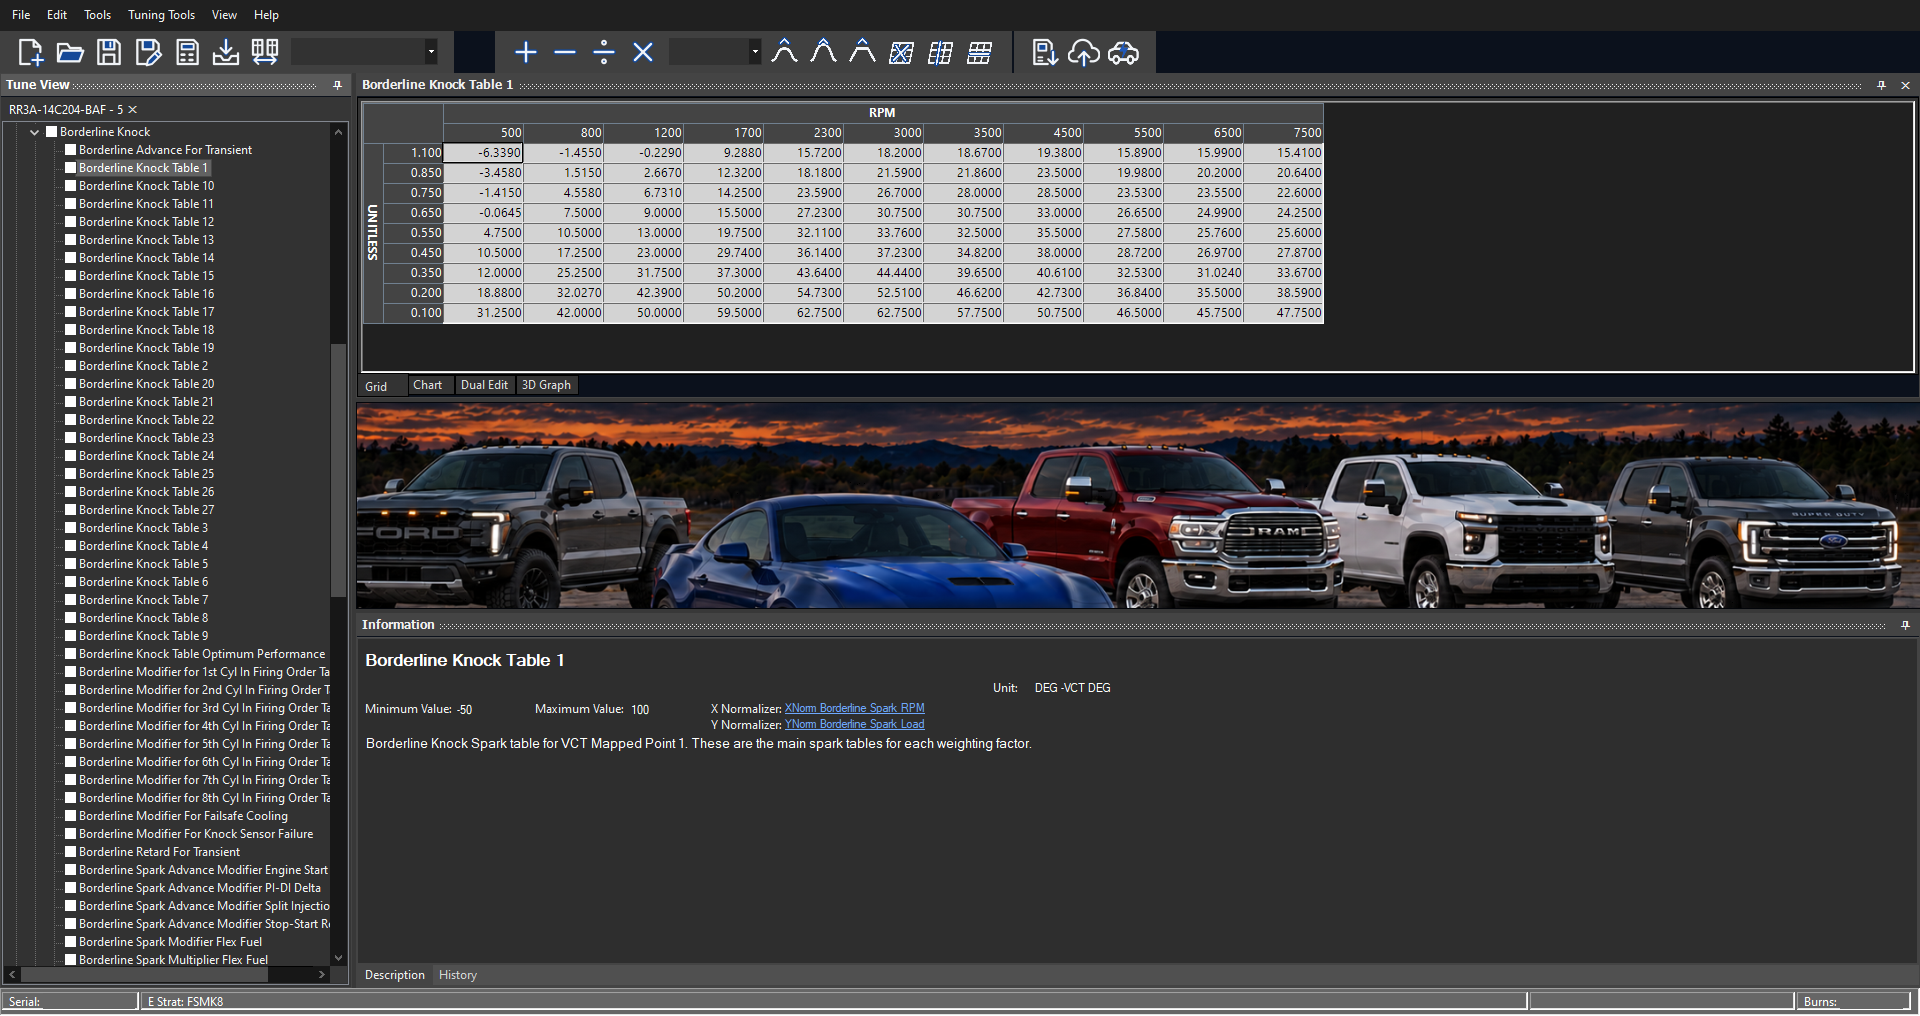 The main window with a table open: Tune View on the left, the editor at the top, the Information panel below it and the status bar along the bottom
| Area | What it shows |
|---|---|
| Menu bar and toolbar (top) | The menus and toolbar buttons (step 3). |
| Tune View (left) | One tab for each open tune, named after the calibration and numbered in the order you opened it (RR3A-14C204-BAF - 5 in the picture). Under the tab is the tune's tree: categories, then subgroups, then items. Every node has a tick box. The ticks choose which items the Selected commands act on (step 11). |
| Editor (top center) | The item you selected. A table has Grid, Chart, Dual Edit and 3D Graph tabs when available along the bottom. Select another item and it replaces this one. Drag the editor's bottom edge down to make it taller. The pin at its top right hides it to a tab at the top (step 7). |
| Information (bottom) | The selected item's name, Unit, Minimum Value and Maximum Value, the X Normalizer and Y Normalizer links, and a description if available. The History tab, beside the Description, lists the changes made to the tune (step 6). |
| Status bar (bottom edge) | Serial, the strategy and Burns (see below) |
The status bar
- Serial — the serial number of your dongle.
- Strategy — the strategy of the open calibration. It reads Strategy: followed by the code (for example Strategy: FSMK8FC), or E Strat: followed by the code (E Strat: FSMK8 in the picture).
- Burns — the burn count for your dongle. This resets at every app relaunch.
3. The toolbar and menus
 The toolbar with its 22 buttons and boxes numbered
The toolbar has three groups: files (1–8), math (9–19) and devices (20–22). Hover over a button to see its name.
| # | Button | Use it to |
|---|---|---|
| 1 | New Tune | Open the welcome screen (step 4) |
| 2 | Open Tune | Open a saved tune or SUL file (step 4) |
| 3 | Save Tune | Save your changes into the tune file you opened. For a stock file, use Save Tune As (step 18) |
| 4 | Save Tune As | Save the tune under a new name (step 18) |
| 5 | Windows Calculator | Start the Windows Calculator |
| 6 | Load All Values | Apply a value file to the open tune (step 10) |
| 7 | Compare Tunes | Open the Compare panel (step 12) |
| 8 | Find Item box | Type an item's full name and press Enter (step 5) |
| 9 | Add | Add the number in box 13 to the selected cells (step 8) |
| 10 | Subtract | Subtract the number in box 13 from the selected cells |
| 11 | Divide | Divide the selected cells by the number in box 13 |
| 12 | Multiply | Multiply the selected cells by the number in box 13 |
| 13 | Value box | Type the number the four math buttons use |
| 14 | Interpolate Selected | Fill the selected cells with evenly spaced values between the outer cells |
| 15 | Interpolate Vertical | Interpolate down each column of the selection |
| 16 | Interpolate Horizontal | Interpolate along each row of the selection |
| 17 | Smooth Selected | Smooth out the selected cells |
| 18 | Smooth Vertical | Smooth down each column of the selection |
| 19 | Smooth Horizontal | Smooth along each row of the selection |
| 20 | Program Device | Program a currently connected SCT device |
| 21 | Upload To Cloud | Open ADVX Editor Cloud to send a tune to a customer |
| 22 | Direct Flash | Program a vehicle through a connected device direct through ADVX Editor (Support limited) |
The menus
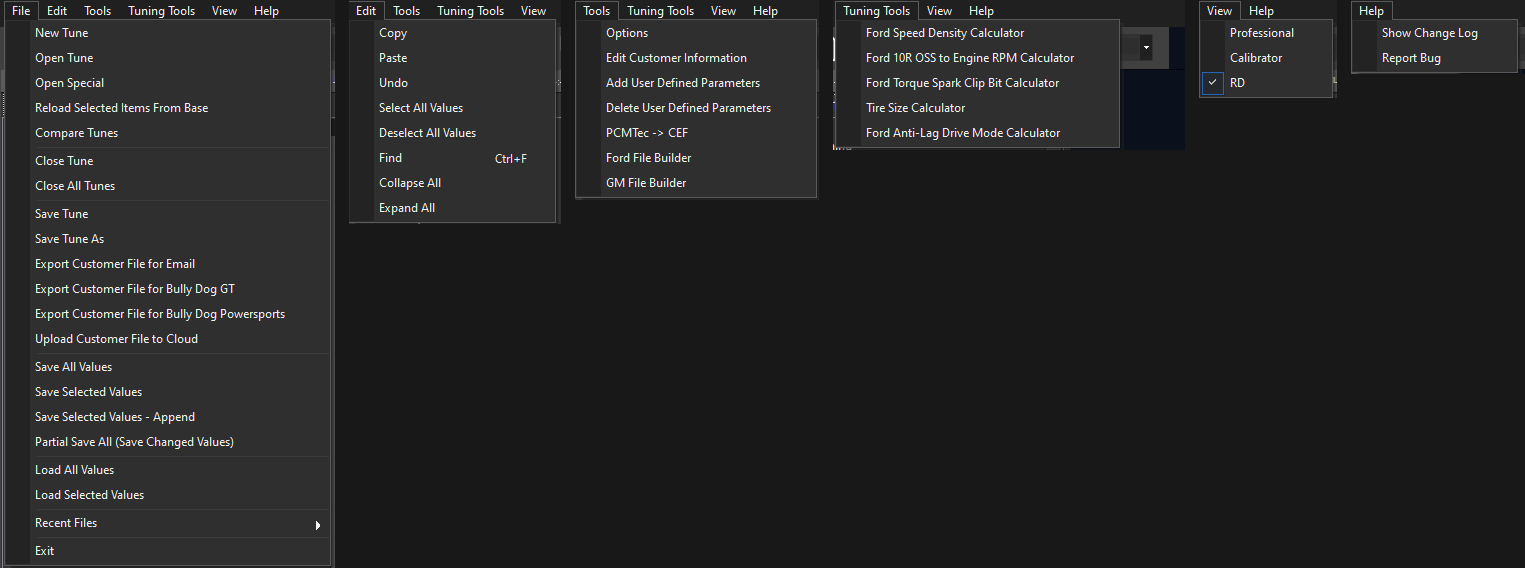 All six menus open: File, Edit, Tools, Tuning Tools, View and Help
| Menu | What it holds |
|---|---|
| File | Opening, closing and saving tunes, customer files and value files (see below) |
| Edit | Copy, Paste and Undo (step 8). Select All Values and Deselect All Values (step 11). Find (Ctrl+F), Collapse All and Expand All (step 5) |
| Tools | Options and the file tools: Edit Customer Information, Add User Defined Parameters, Delete User Defined Parameters, PCMTec -> CEF, Ford File Builder and GM File Builder (step 15) |
| Tuning Tools | Five calculators: Ford Speed Density, Ford 10R OSS to Engine RPM, Ford Torque Spark Clip Bit, Tire Size, and Ford Anti-Lag Drive Mode (step 14) |
| View | Professional, Calibrator and RD: user levels set by your Dongle (step 15) |
| Help | Show Change Log, Report Bug |
The File menu
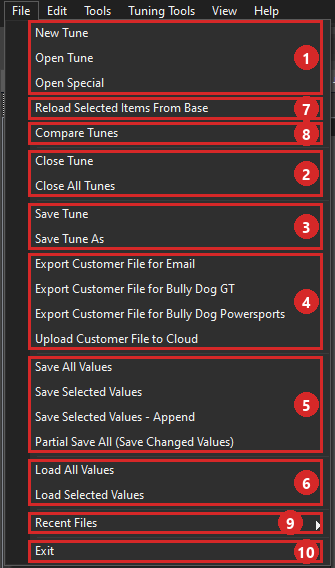 The File menu with its ten groups numbered
| Group | Commands | See |
|---|---|---|
| 1 Open | New Tune, Open Tune, Open Special | Step 4 |
| 2 Close | Close Tune, Close All Tunes. Close All Tunes closes every open tune at once; save any tune you want to keep first | Step 18 |
| 3 Save | Save Tune, Save Tune As | Step 18 |
| 4 Customer files | Export Customer File for Email, Export Customer File for Bully Dog GT, Export Customer File for Bully Dog Powersports, Upload Customer File to Cloud | Step 16 |
| 5 Save values | Save All Values, Save Selected Values, Save Selected Values - Append, Partial Save All (Save Changed Values) | Step 11 |
| 6 Load values | Load All Values, Load Selected Values | Step 10 |
| 7 Reload | Reload Selected Items From Base is for items ticked in Tune View. To return values to stock, use right-click → Reload in the editor | Step 8 |
| 8 Compare | Compare Tunes opens the Compare panel | Step 12 |
| 9 Recent files | Recent Files lists the tune files you have opened recently. Choose one to open it again | Step 4 |
| 10 Exit | Exit closes ADVX Editor. First, it asks whether to save each tune that has unsaved changes | Step 18 |
4. Open a calibration
Start a new tune from a stock calibration by entering its identifier, or open a tune file you already have.
Start a new tune from its identifier
The New Tune welcome screen opens when ADVX Editor starts. To open it at any other time, choose File → New Tune or press New Tune (button 1 in the toolbar).
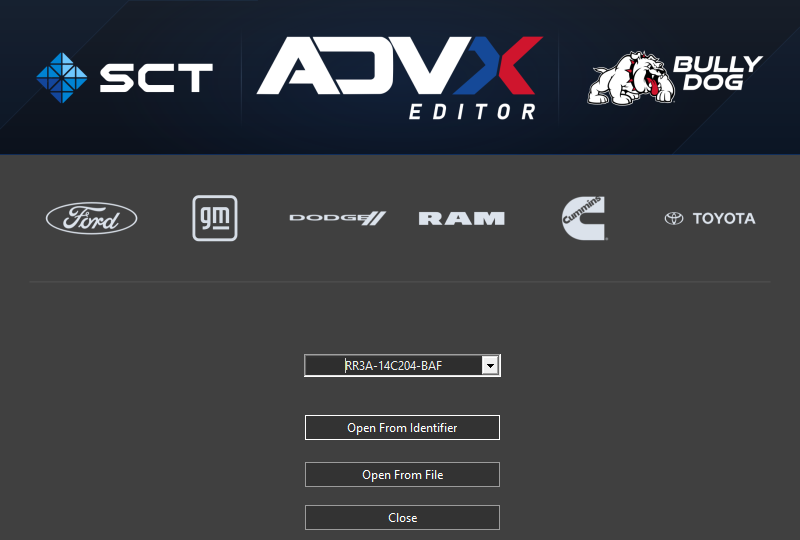 The New Tune welcome screen with an identifier in the drop-down
- Type the identifier in the box or choose it from the drop-down. The drop-down lists identifiers you have opened before.
- Select Open From Identifier. ADVX Editor loads the stock calibration for that identifier, so you do not need a tune file.
Open From File opens a saved tune instead (see "Open a saved tune" below).
Close closes the welcome screen.
What to type as the identifier
| Make | What to type | Where to find it |
|---|---|---|
| Ford | The software part number, with 14C204 in the middle, for example RR3A-14C204-BAF. Used mostly on 2015 and later vehicles | Vehicle Info on your device |
| Ford | The 7-character strategy | Vehicle Info on your device |
| Ford | The 3- or 4-character box code | The label on the PCM. Box codes have been reused on other platforms, so on an OBD-II vehicle check the strategy too |
| Cummins | The 10-character ECU part number | Vehicle Info on your device |
| GM | No identifier: start from a VIN or stock upload depending on the vehicle model | Read from the vehicle with your device |
For example, type the Ford strategy FSMK8FC and press Open From Identifier. ADVX Editor fetches the stock calibration (a short progress window may appear) and opens it on a new tab, RR3A-14C204-BAF - 1. The status bar shows Strategy: FSMK8FC.
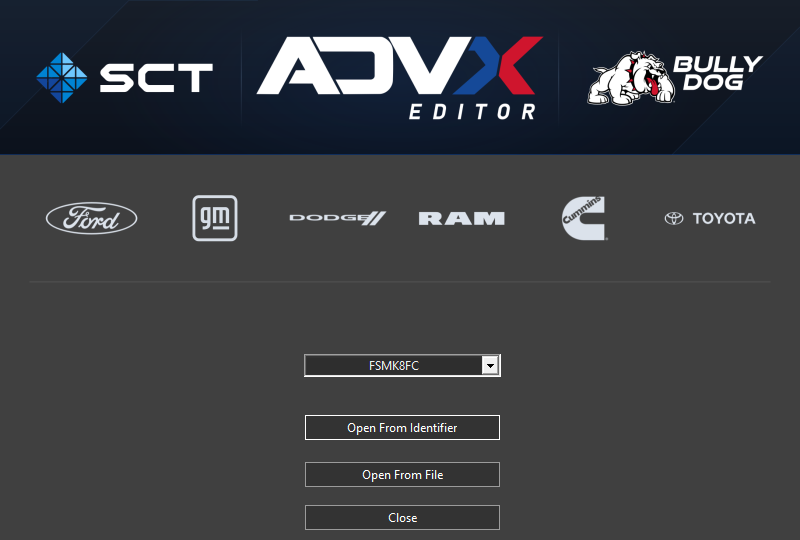 The welcome screen with the strategy FSMK8FC typed in the identifier box
Open a saved tune
Choose File → Open Tune, press Open Tune (button 2 on the toolbar), or press Open From File on the welcome screen. Each opens a file dialog with the same file type and folder.
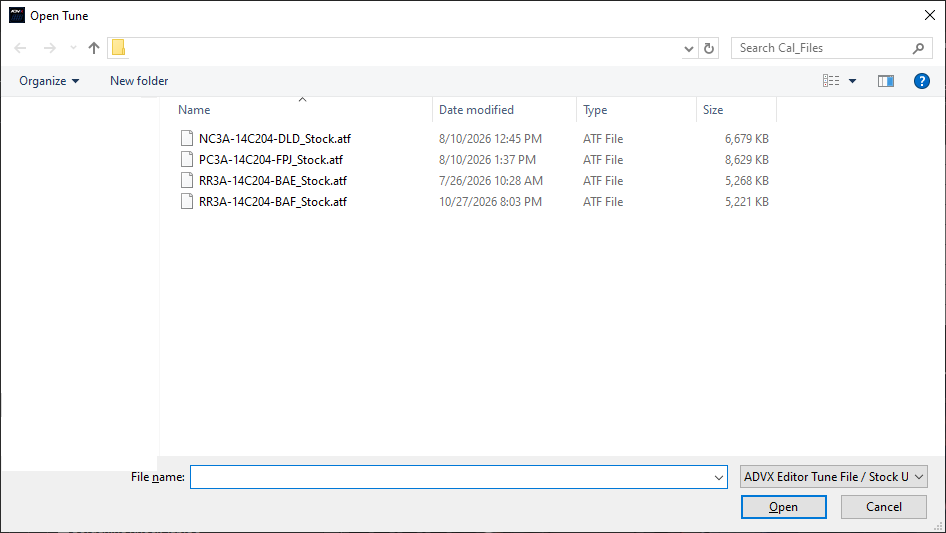 The Open Tune dialog listing tune files
- The file type is ADVX Editor Tune File / Stock Upload (*.mtf;*.mtu;*.sul;*.atf). ADVX Editor saves tunes as .atf files.
- At first the dialog opens in your Tune Files folder, set in Tools → Options → Directories (step 15). After that it opens in the last folder you used for a tune. Browse to another folder if you need to.
- Choose the file and press Open. The tune opens on a new tab, and the title bar shows its file path.
- File → Recent Files lists tunes you have opened from a file, by their full path. Choose one to open it again.
Open several tunes
Each tune you open gets its own tab under Tune View. The tab is named after the calibration, not the file, and numbered in the order you opened it: RR3A-14C204-BAF - 1, - 2, - 3 and so on. The numbers keep counting up as you close and open tunes until you close and reopen ADVX Editor.
 Three tunes open on numbered tabs, with the tab-strip arrows at the right
- You can open the same file more than once. An unchanged copy is a handy stock reference when you work with two tunes (step 13). Compare Tunes can also compare a tune against its own stock values (step 12). Keep track of which tab you are editing.
- When the tabs do not all fit, use the arrows at the right-hand end of the tab strip. Tab names at the edges may be shortened.
Import Cummins files (Open Special)
Use File → Open Special to open a Cummins calibration from your own files instead of from an identifier.
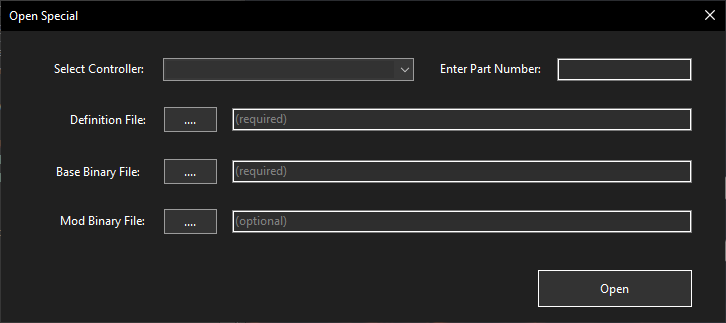 The Open Special window
- Choose your controller in Select Controller:
- 2010-2012 Cummins 6.7L (CM2200)
- 2013-2016 Cummins 6.7L (CM2350B)
- 2017 Cummins 6.7L (CM2350B)
- 2018 Cummins 6.7L (CM2350F)
- 2019-2021 Cummins 6.7L (CM2450)
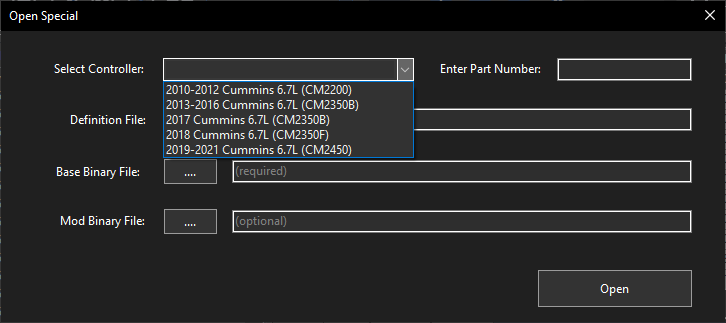 The Select Controller list in Open Special
- Type the calibration part number in Enter Part Number.
- Press the ....button beside each file box and choose the file:
- Definition File (required): the file that lists the calibration's parameters and how they are named and grouped.
- Base Binary File (required): the stock calibration.
- Mod Binary File (optional): your modified calibration, if you have one.
- Press Open. The calibration opens in a new tab, with its tree built from your definition file.
Cummins Shift On The Fly (SOTF) tunes for BullyDog GT Tuner
A Shift On The Fly tune has a default calibration plus three power levels that the driver selects on a BullyDog GT.
- To open one, add SOTF to the end of the Cummins part number on the welcome screen. For example, 32370731AI opens a single tune and 32370731AISOTF opens the SOTF tune.
- The tree then has a Shift On The Fly category with Power Level 1, Power Level 2 and Power Level 3. Each level has its own copies of the main limit, torque and fueling items, with the level at the end of the name, for example Base Fuel Limit Pwr1.
- Everything outside Shift On The Fly is the default level. The truck runs it when the device is unplugged or No Power is selected on the GT. When the driver selects a power level, the truck uses the items you changed in that level and the default values for everything else.
- You can change the default level as well, which gives four levels in all.
- The normal editing features work on SOTF tunes, including value files for a single power level or the whole tune (step 11).
5. Find a parameter
Browse the tree, type an item's full name in the Find Item box, or search for part of a name with Edit → Find.
Browse the tree
The tree under Tune View lists the open tune's categories; the set depends on the calibration. Click the arrow beside a category to expand it, expand a subgroup the same way, then click an item to open it in the editor.
- Single values sit in Scalar folders, for example Spark → Scalar. Click the folder to see all its values in one list (step 7).
- A table's axes are separate XNorm and YNorm items. Spark, for example, keeps them in an XY Normalizers folder (step 9).
- Edit → Expand All opens every node in the tree; on a large tune this takes a few seconds. Edit → Collapse All collapses them again.
- The checkboxes choose items for value files (step 11). You do not need them to open an item.
Use the Find Item box
Type the item's full name in the Find Item box on the toolbar (box 8) and press Enter. The box is not case sensitive: global spark adder finds Global Spark Adder. The box needs the whole name; if you know only part of it, use Edit → Find.
Use Edit → Find
Choose Edit → Find or press Ctrl+F. Type part of a name in Find Text and press Find.
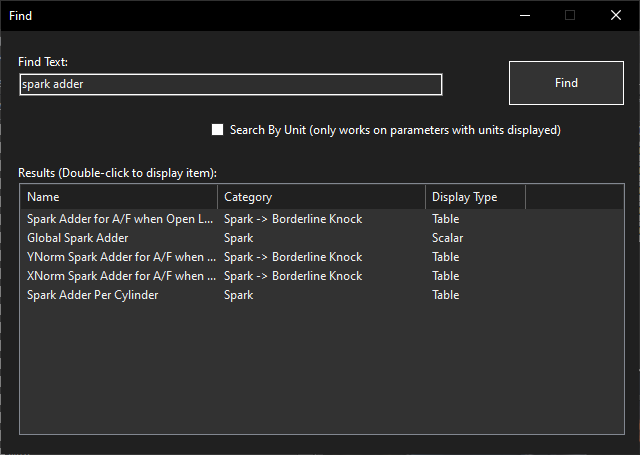 The Find window listing five results for spark adder
- The search matches part of a name, in any capitals: spark adder lists five items.
- Each result shows its Name, its Category (with the subgroup, for example Spark -> Borderline Knock) and its Display Type (Scalar or Table). Normalizers are listed as Table.
- Double-click a parameter to open it. The Find window stays open, so you can work down the list.
Search by unit
Tick Search By Unit to search units instead of names. Type the unit as the Information panel shows it, for example KPH, and press Find. Only items that display a unit are found.
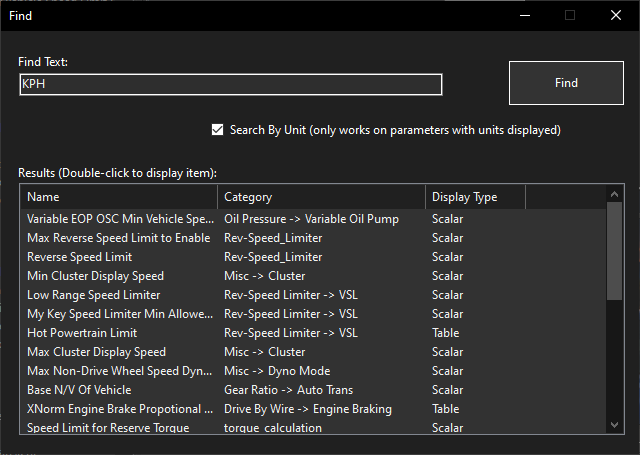 The Find window with Search By Unit ticked, listing items whose unit is KPH
Check what opened
A single value (Scalar) found with the Find Item box or Edit → Find opens inside its Scalar group, one row per value: find the item's row by name (step 7). Go by the tree selection and the Information panel to confirm which item you are on (step 6).
6. Read the Information Panel and History
The Information panel at the bottom of the window describes the item you select. Read it before you change anything. It has two tabs at the bottom: Description and History.
 The Information panel for Borderline Knock Table 1, with the X and Y Normalizer links (1)
Description
The Description tab shows:
- the item's name, in bold at the top
- Unit, for example DEGCA, KPH or UNITLESS
- Minimum Value and Maximum Value. Keep every value you enter inside this range.
- X Normalizer and Y Normalizer (example 1), on a table. These links open the items that set the table's column and row headings (step 9). The tree selects the normalizer too. To go back, click the table in the tree.
- a description of what the item does (if available). Some descriptions explain how items work together. Spark Retard for ECT, for example, explains how its coolant-temperature values combine with an RPM-and-load multiplier.
Livelink tags
Many descriptions also name the Livelink Gen2 parameter to log for that item, after Livelink- in braces or brackets. For example, WOT Shift Schedule RPM includes {Livelink-SHIFT SCHEDULE RPM UPSHIFT PER MODE} (1), and Torque Table 1 includes {Livelink-TORQUE AIR MASS CONVERSION}. Log that parameter in Livelink Gen2 to watch the item at work in the vehicle. In Livelink, the matching parameter's description names the item after Advantage-. Not every item has a tag.
 The description of WOT Shift Schedule RPM, with its Livelink tag (1)
History
The History tab lists the changes made to the whole tune, newest first. It shows the same list whichever item you select.
 The History tab: the tune's changes, newest first
Each line starts with the date (month/day/year) and the time (12-hour clock), then the item and the change:
| Change | History line |
|---|---|
| Value typed into a table | borderline_knock_table_1: Changed value 27.23 to 28 in row 3, column 4. |
| Value typed into a scalar | global_spark_adder: Changed value 0 to 5. |
| Several cells changed at once | borderline_knock_table_1: Changed multiple values. |
| Right-click → Reload | borderline_knock_table_1: Reloaded selected cells to stock. or global_spark_adder: Reloaded to stock. Value changed from 5 to 0. |
| Value file loaded | Applied changes of value file, followed by the file's full path |
- Item names appear with underscores in place of spaces, usually in lower case. A normalizer keeps its capitals, for example XNorm_Borderline_Spark_RPM.
- Rows and columns count from 0. Row 3, column 4 is the fourth row down and the fifth column across.
- A value-file line names the file, not the items it changed. To list those items, compare the tune against Stock (step 12).
- History is saved in the tune file. Anyone you give the tune file to can read it, including the full path of each value file you loaded, which can show your folder names. Keep this in mind before you share a tune.
7. The editors
Click an item in the tree to open it in the editor. The editor shows one item at a time: clicking another item replaces it. Drag the editor's bottom edge down to make it taller.
| You click | You get | Tabs |
|---|---|---|
| A single value (scalar) | One cell, headed Value | Grid, Chart, Dual Edit |
| A Scalar folder | Every scalar in that group, one row each | Grid, Dual Edit |
| A table | The cell values, with the X axis across the top and the Y axis down the left | Grid, Chart, Dual Edit, 3D Graph |
| A normalizer (XNorm / YNorm) | The axis breakpoints and their positions (step 9) | Grid, Chart, Dual Edit |
Dual Edit shows a second open tune beside this one. Type your changes in the left-hand grid; to change the other tune, switch to its tab (step 13).
To confirm which item is open, check the tree selection and the Information panel.
Single values (scalars)
Click the item itself in the tree, for example Spark → Scalar → Global Spark Adder. The editor shows one cell, headed Value.
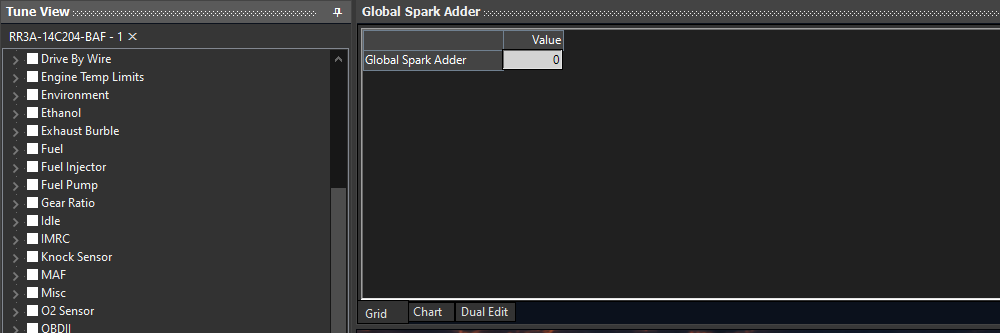 A single scalar, Global Spark Adder, on the Grid tab
Scalar groups
Click a Scalar folder in the tree to list every scalar in that group, one row each. Edit → Find and the Find Item box also open a scalar in its group (step 5). For the single-cell view, click the item in the tree.
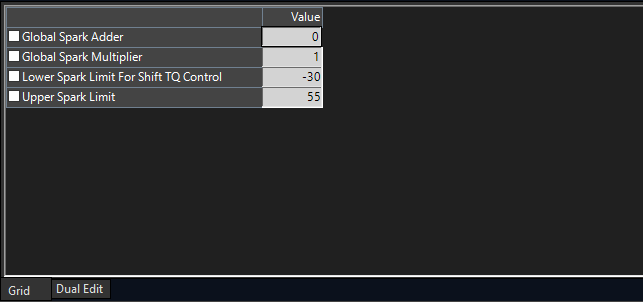 The Spark Scalar group: one row per scalar, each with a tick box
Each row has a tick box. Ticking a row is the same as ticking that item in the tree (step 11).
Switches
Switches are ordinary scalars, usually 0 or 1. Many are grouped in System Switches → Scalar. Read the description to see what each value means. Start Stop Enable, for example, reads "1 Start Stop Enabled; 0 Start stop disabled", with a Minimum of 0 and a Maximum of 1.
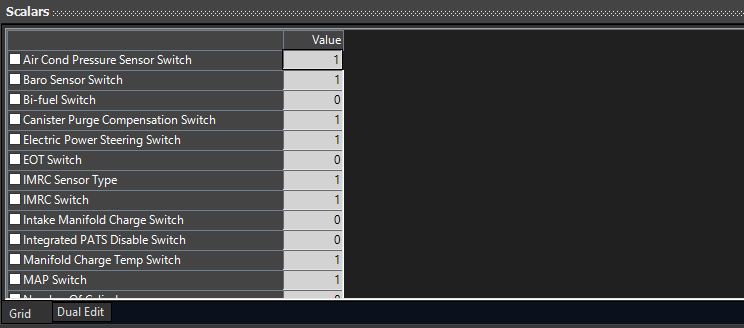 The System Switches Scalar group: one row per switch, each set to 0 or 1
Tables
A table opens on the Grid tab. The column headings across the top are the X axis, and the row headings down the left are the Y axis. Each axis name is printed beside its headings. Borderline Knock Table 1 has 11 RPM columns (500 to 7500) and 9 UNITLESS rows (1.100 to 0.100). The headings come from the table's normalizers (step 9).
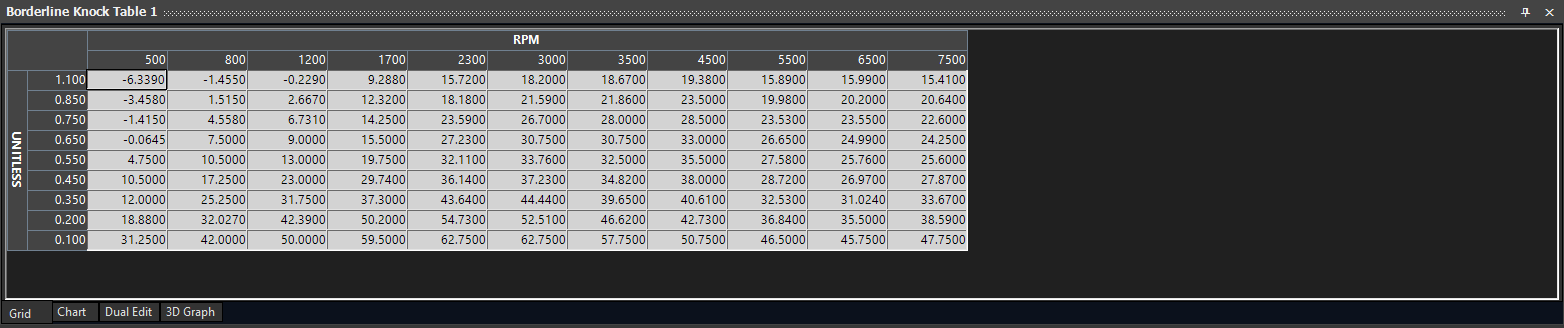 Borderline Knock Table 1 on the Grid tab: RPM across the top, UNITLESS down the left
Chart
Chart draws one line for each row of the table, across the columns, with the cell values on the vertical scale. For axis names, units and breakpoints, use the Grid tab.
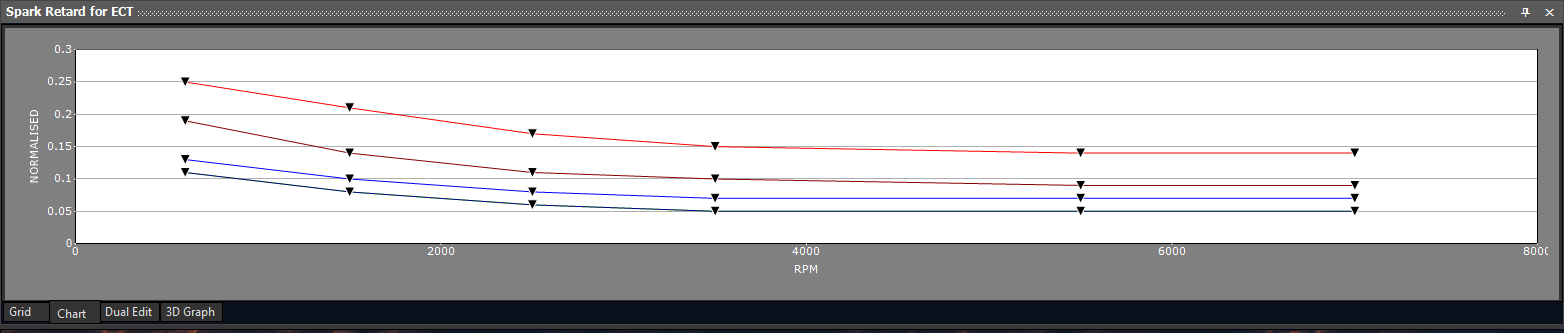 The Chart tab of Spark Retard for ECT: one line for each table row
3D Graph
3D Graph draws the table as a colored surface. An axis triad sits at the bottom left and a view cube at the bottom right. The axis labels read, for example, RPM (X Axis). For full axis details, use the Grid tab. If the surface looks small, zoom in with the mouse wheel.
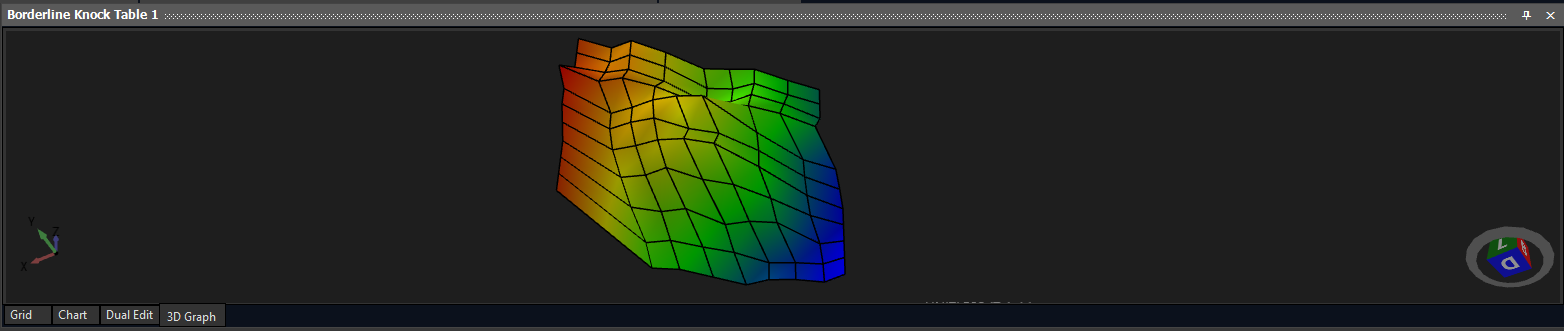 The 3D Graph tab
Caution: take care with the left mouse button. If you left-click a point and move it, you change that value in the table. To look around without changing anything, use the right mouse button, the wheel, the view cube and the keys below.
Mouse
| Do this | Result |
|---|---|
| Hover over a point | Shows its value and axis positions |
| Hover over the graph and turn the mouse wheel | Zooms in (wheel forward) and out (wheel back) |
| Hold Ctrl and the right button, and move the mouse up or down | Zooms (instead of the wheel) |
| Hold the right button and move the mouse | Rotates the graph view |
| Hold Shift and the right button, and move the mouse | Drags the graph |
| Hold the middle button and move the mouse | Moves the graph |
| Double-click the middle button | Returns to the starting view |
| Left-click a side of the view cube (bottom right) | Turns the graph to face that side |
| Hold Shift and left-click points | Selects several points |
| Left-click off the graph | Deselects the points |
| Left-click a point and move it | Changes that value in the table |
Keyboard
| Keys | Result |
|---|---|
| Ctrl+Z / Ctrl+Q | Moves the graph up / down |
| Ctrl+A | Moves the graph right |
| Ctrl+W / Ctrl+S | Moves the graph closer / away |
| Ctrl+F / Ctrl+B | Front view / back view |
| Ctrl+U / Ctrl+D | Up view / down view |
| Ctrl+L / Ctrl+R | Left view / right view |
| Ctrl+Up Arrow / Ctrl+Down Arrow | Rotates the graph backwards / forwards |
| Ctrl+Left Arrow / Ctrl+Right Arrow | Rotates the graph left / right |
Rotating, zooming and moving the view do not change the table. In the 3D Graph, Ctrl+Z moves the graph up. To put a changed value back to stock, open the Grid tab, select the cell and use right-click → Reload (step 8).
Hide the editor (the pin)
The pin at the editor's top right hides the editor to a tab along the top edge, under the toolbar. Click the tab to slide the editor out over the tree; pointing at the tab is not enough. Click the pin again to dock the editor.
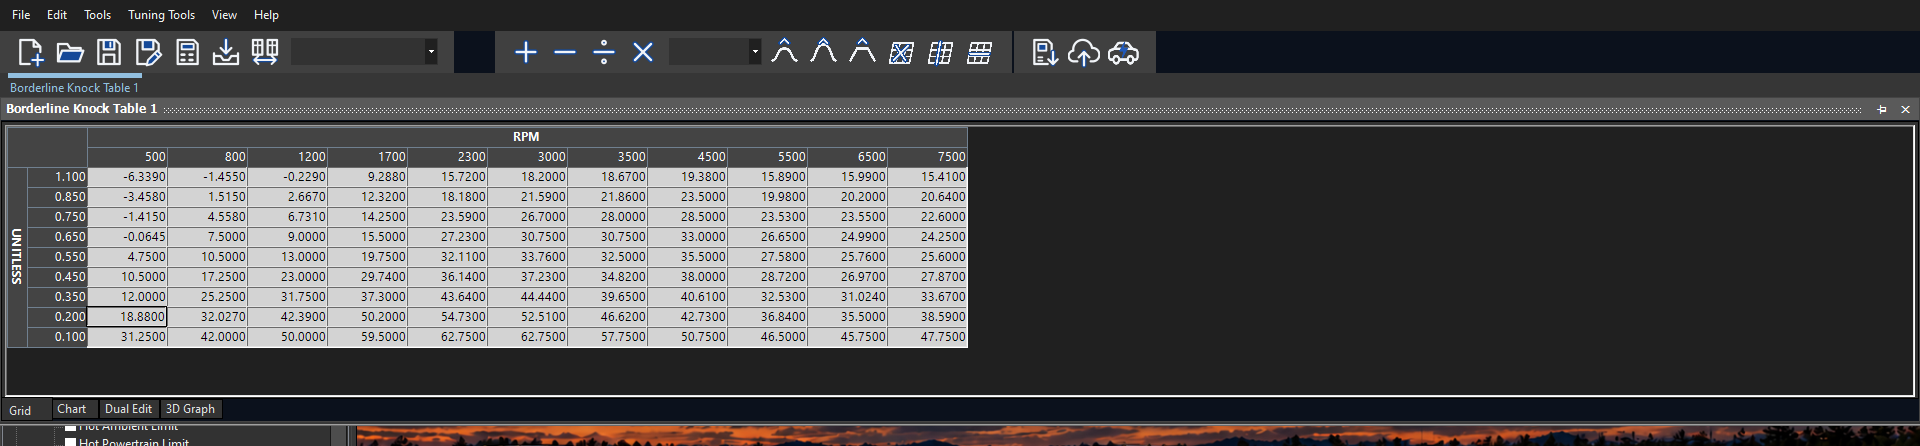 The editor slid out from its tab under the toolbar
The Tune View and Information panels have pins that work the same way. If a panel shows only as a tab at the edge of the window, click the tab, then click the pin to dock it.
8. Change values
Type a value
Click a cell, type the new number and press Enter. The selection moves down one row, and the value turns red or blue if it differs from stock (see "Read the colors" below). Single values work the same way. The History tab logs the change (see step 6).
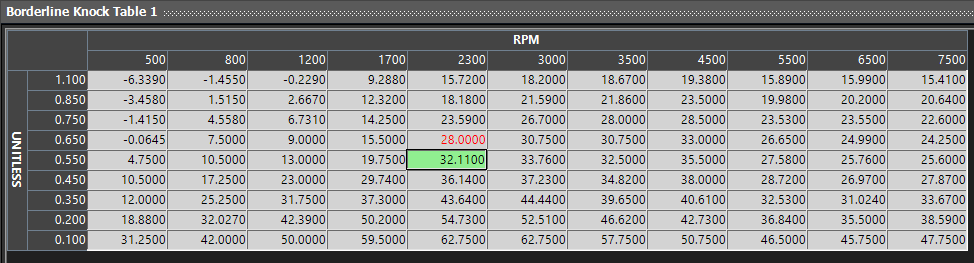 The typed value 28 shows in red, and the selection has moved down one row
Change a block with math
- Select the cells. Click one cell, or press on the first cell and drag to the last cell in one movement. The block turns cyan and the active cell turns green.
- Type a number in the value box (13), next to the math buttons (see step 3).
- Press Add, Subtract, Divide or Multiply(buttons 9–12). ADVX Editor applies the number to every selected cell.
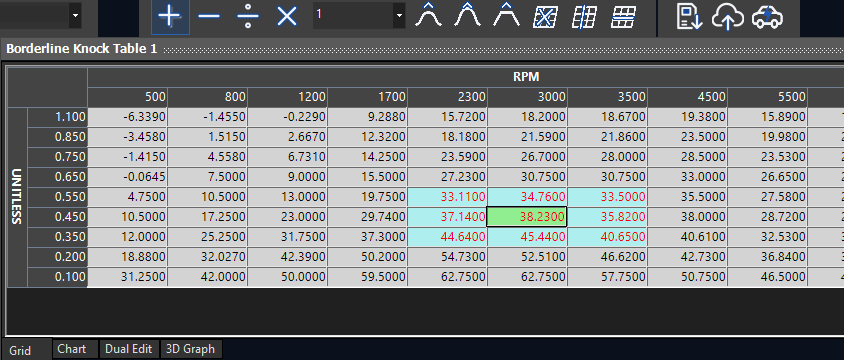 Add with 1 in the value box, applied to a 3 × 3 block; the raised values show in red
Read the colors
ADVX Editor compares each value with the tune's stock value:
- Red: higher than stock.
- Blue: lower than stock.
- Black: the same as stock.
The colors stay when you save and reopen the tune. The tree and the tune's tab do not mark changed items. To list every change, compare the tune against Stock (see step 12).
Digits in the grid
Each table shows a set number of decimals, so a stored value can have more digits than the grid shows.
- Edit → Copy copies the full stored values. Ctrl+C copies only the digits the grid shows.
- Compare Tunes shows values to three decimals (see step 12).
The right-click menu
Right-click a cell to open this menu:
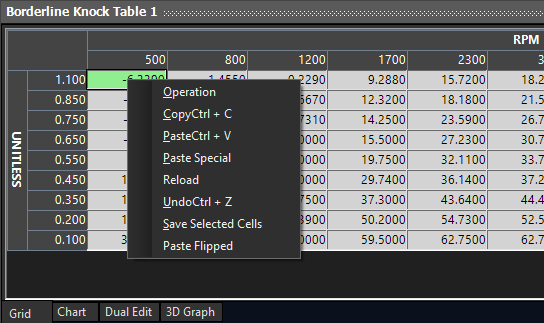 The right-click menu on a table
| Item | What it does |
|---|---|
| Copy (Ctrl+C) | Copies the selected cells |
| Paste (Ctrl+V) | Pastes the copied cells, starting at the selected cell. Also works between tunes (see step 13) |
| Reload | Returns the selected cells, or a single value, to stock |
| Undo (Ctrl+Z) | Undoes the last change |
| Save Selected Cells | Saves the selected cells to a value file (see step 11) |
| Paste Flipped | Pastes the copied rows upside down: the last row you copied comes first, and the columns keep their order. Values that would fall past the edge of the table are not pasted |
The menu also lists Operation and Paste Special.
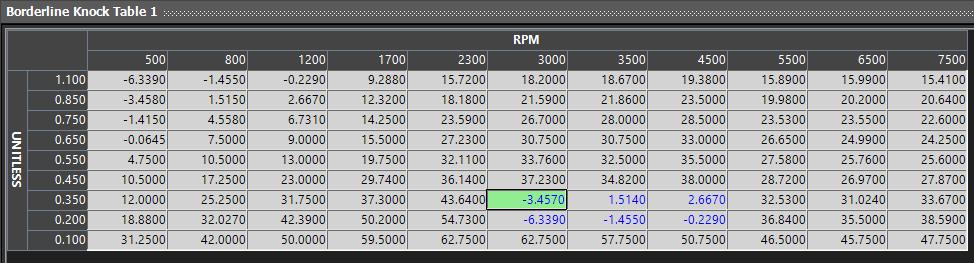 Paste Flipped: rows 1.100 and 0.850 (columns 500–1200) pasted upside down, starting at row 0.350, column 3000
When you use Save Selected Cells, the save dialog lists the type as Mako Value File (*.mvf), the same .mvf format. Check the folder before you save and keep your own files outside the Value Files library.
Undo or return to stock
- Ctrl+Z undoes the last change. Undo is also on the Edit menu and the right-click menu.
- To return values exactly to stock, select them, right-click and choose Reload. Reload works on table cells and single values. The values turn black, and History logs the reload.
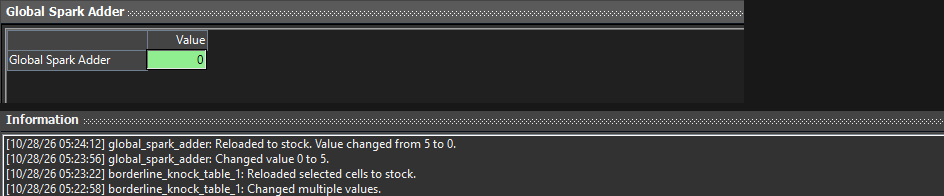 Reload returns Global Spark Adder to its stock value, 0; History lists the change and the reload
Interpolate and Smooth
Buttons 14–19 work on the selected cells:
- Interpolate (Selected, Vertical, Horizontal) fills the selected cells with evenly spaced values between the outer cells.
- Smooth (Selected, Vertical, Horizontal) evens out the selected cells.
Check the result before you go on.
Stay within Minimum and Maximum
Before you change an item, check its Minimum Value and Maximum Value in the Information panel (see step 6). Keep every value inside that range, whether you type it, calculate it or paste it.
9. Change a table's axes (normalizers)
A table's axes are separate items called normalizers. An XNorm sets the table's columns (X axis), and a YNorm sets its rows (Y axis). A normalizer holds two things:
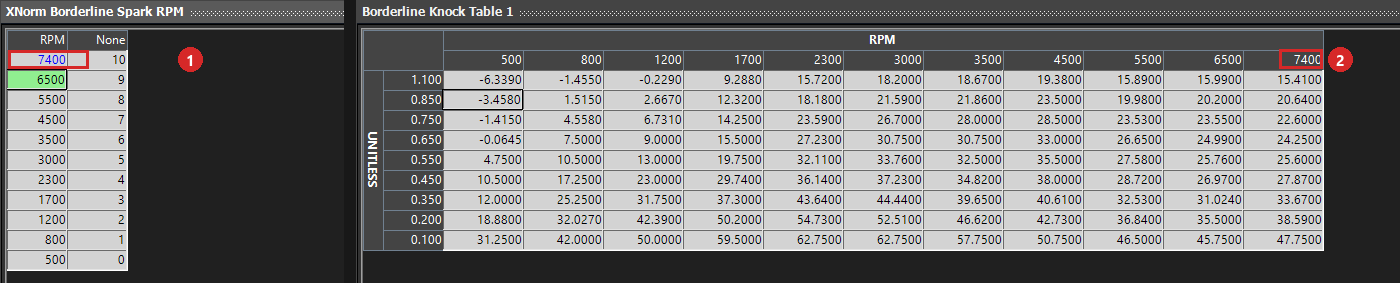
- Breakpoints: the axis values, which you see as the table's column or row headings. The RPM headings 500 to 7500 on Borderline Knock Table 1 come from XNorm Borderline Spark RPM.
- Positions: where each breakpoint falls on the table's axis, counting from 0. Borderline Knock Table 1 has 11 columns, so its X positions run from 0 to 10.
Find a table's normalizers
- From the table: click the X Normalizer or Y Normalizer link in the Information panel (step 6). The editor switches to the normalizer, and the tree selects it. Before you edit, check that the tree shows the normalizer selected; if it does not, click the normalizer in the tree.
- From the tree: look for an XY Normalizers folder in the table's category, for example Spark → XY Normalizers. Other XNorm and YNorm items are listed at the end of a subgroup or directly in a category.
- With Edit → Find: type part of the normalizer's name, for example XNorm Borderline(step 5).
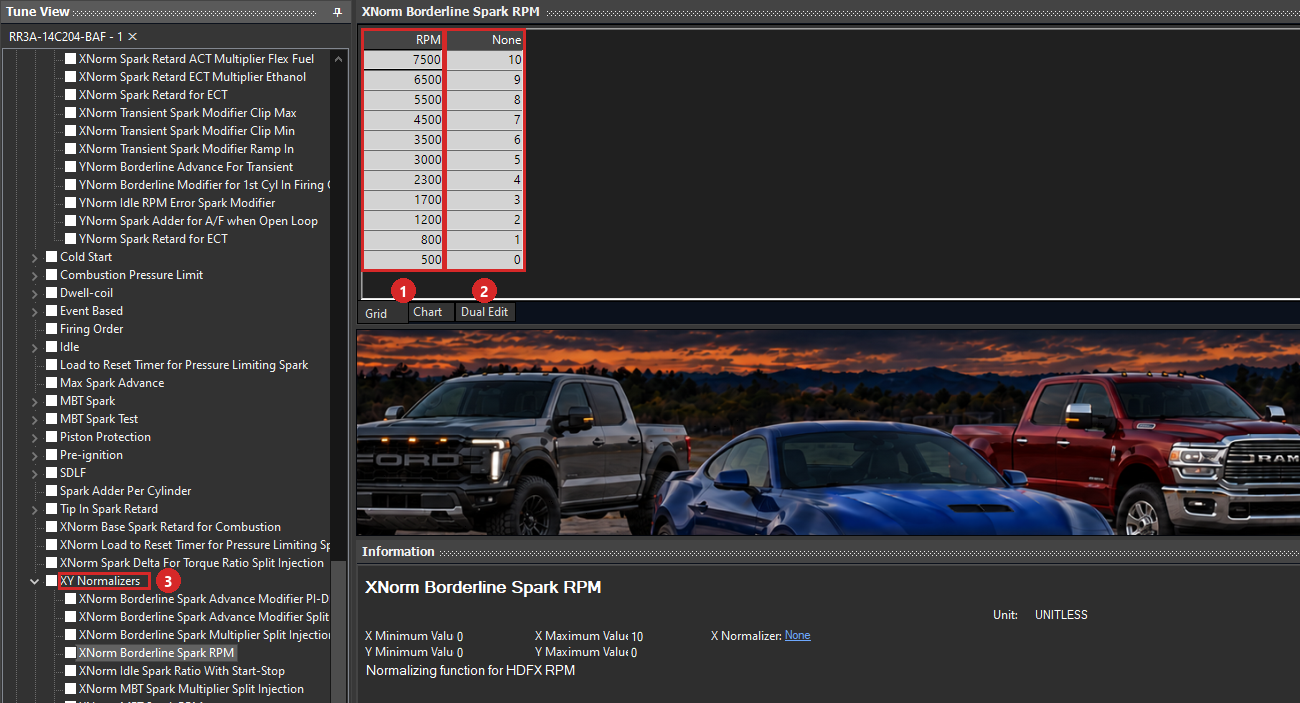 XNorm Borderline Spark RPM: breakpoints (1), positions (2) and the XY Normalizers folder in the tree (3)
A normalizer opens as a two-column grid, with Grid, Chart and Dual Edit tabs. In the picture, the red boxes mark:
- The breakpoint column (example 1), headed with the axis name (RPM). It lists the breakpoints highest first. Borderline Knock Table 1 shows the same values from left to right, lowest first.
- The position column (example 2), headed None.
- The XY Normalizers folder in the tree (example 3).
The Information panel shows the normalizer's unit, separate X and Y minimum and maximum values, and a description. A YNorm works the same way for the table's rows.
Change a breakpoint
Edit a normalizer like any other grid (step 8), but check these points first:
- One normalizer can set the axis of several tables. Changing a breakpoint changes that heading on every table that uses the normalizer. Before you change one, open each table you rely on and check its X and Y Normalizer links.
- Keep the breakpoints in order. In XNorm Borderline Spark RPM each breakpoint is lower than the one above it; keep that order.
- Check the result. Open a table that uses the normalizer and check that its headings show the new breakpoints.
- To undo, select the normalizer cells and use right-click → Reload. They return to their stock values.
In the example below, the top breakpoint of XNorm Borderline Spark RPM was changed from 7500 to 7400 (example 1, value is blue because it is lower than stock). Borderline Knock Table 1's last column heading then reads 7400 (example 2).
 A normalizer breakpoint changed (1) and the table heading that follows it (2)
Skipped positions
Some calibrations skip position numbers: for example, 0, 2, 7, and then 10 for the rest. The table columns between those positions have no breakpoint of their own; their axis values are interpolated from the breakpoints on either side. You can change the breakpoints and positions so that each column has its own breakpoint.
Value files can change normalizers as well as tables (step 10). If you save selected values after changing an axis, tick the XNorm or YNorm item as well as the table (step 11).
10. Load a value file
A value file (.mvf) holds a set of item values. Loading one applies its values to the open tune in one step, which is much quicker than changing each item by hand.
ADVX Editor comes with a library of base value files in its Value Files folder, sorted by country, make and model. For example, Value Files\United States\2021\Ford\Mustang\2024-2025 5.0L Mustang\Automatic\NA\ holds the 24-25 5.0L 10R80 Mustang 87, 91 and 93 Oct files, one for each fuel octane. You can also save your own value files (see step 11).
ADVX Editor applies a value file to whatever tune is open. Choose files made for your vehicle and calibration, then check the result.
Load all the values in a file
- Open the tune you want to change (see step 4).
- Choose File → Load All Values or click toolbar button 6.
- The first time, the dialog opens in the ADVX Editor folder. Double-click Value Files and work down through the folders to your vehicle. After that, it opens in the last folder you used.
- Select the file and click Open.
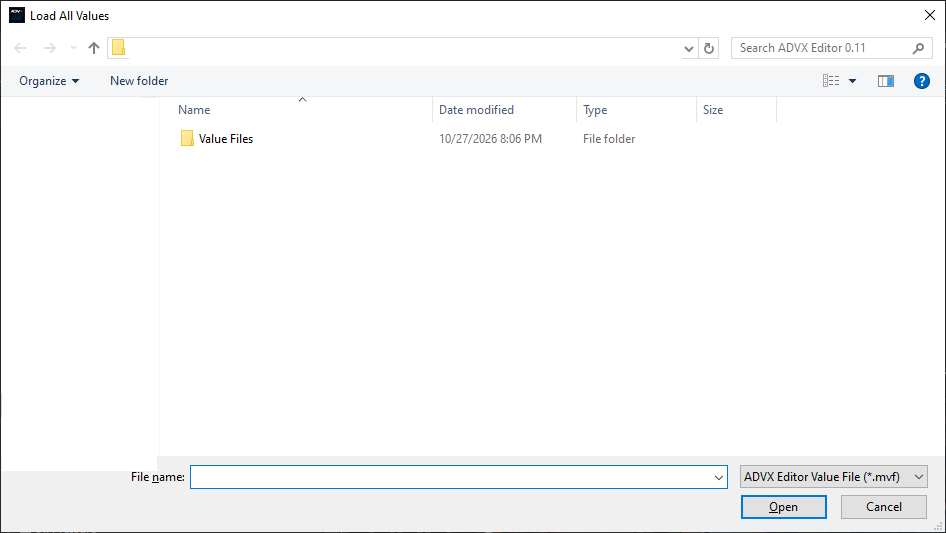 The Load All Values dialog, showing the Value Files folder
Check what changed
No message appears after the file loads. To check the result, use any of these:
- Open a changed item. Values that differ from stock are red (higher) or blue (lower).
- Open the History tab (see step 6). It shows Applied changes of value file followed by the file's path. This confirms that the file was applied, but not which items it changed.
- Compare the tune against Stock (see step 12) to list every changed item.
For example, the 93 Oct file changes 48 items in a stock RR3A-14C204-BAF tune. Speed Limiter rises from 249.5 to 273.5 KPH and Start Stop Enable changes from 1 to 0.
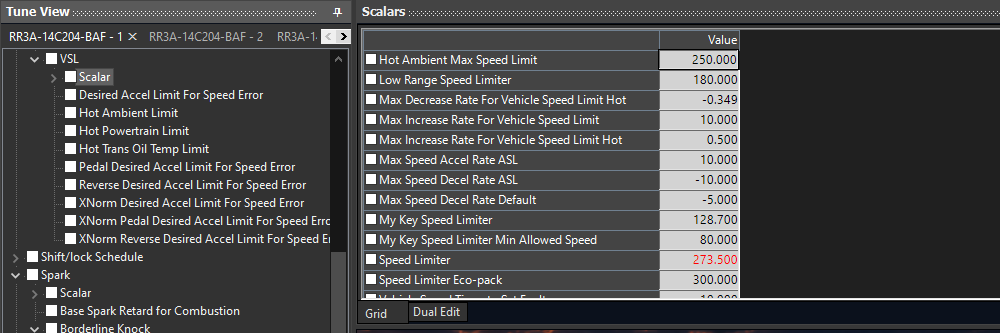 The VSL Scalars list after loading the 93 Oct file: Speed Limiter at 273.500, in red
 Start Stop Enable at 0, in blue
To return the value to stock, right-click it and choose Reload (see step 8).
Load only the items you tick
File → Load Selected Values applies a value file to the ticked items only. All other items keep their current values.
- Choose Edit → Deselect All Values to clear any earlier ticks.
- In Tune View, tick the categories or items you want the file to change (see step 11).
- Choose File → Load Selected Values, then select the file and open it.
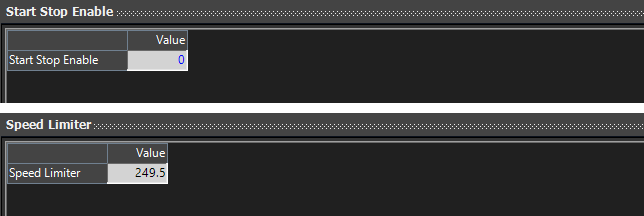 After Load Selected Values with only System Switches ticked: Start Stop Enable changed to 0 (blue), while Speed Limiter kept its stock 249.5
11. Tick items and save values
Tick items
Ticks choose which items the Selected commands work on.
- In Tune View, tick the box beside a category or an item. Ticking a category ticks everything under it. Ticking a single item does not tick the category above it.
- In a Scalar group's Scalars list, each row has its own box. It is the same tick as the item's box in the tree.
- Edit → Select All Values ticks every category. Edit → Deselect All Values clears every tick.
Choose a save command
The value-file commands sit together in the File menu: the save commands in group 5 and the load commands in group 6.
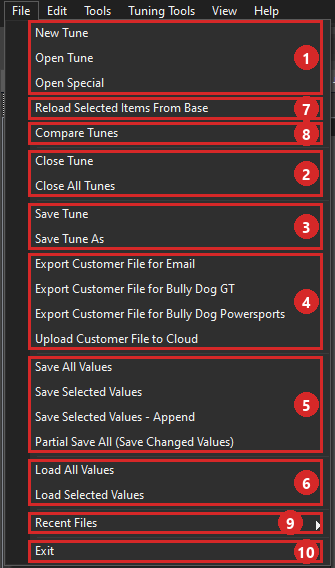 The File menu: value-file save commands (5) and load commands (6)
| Command | Saves | Use it to |
|---|---|---|
| Save All Values | Every value in the tune | Keep a complete copy of the tune's values. Load the file only into a tune with the identical strategy (shown in the status bar). |
| Save Selected Values | Only the ticked items | Save a hand-picked set of items, such as one category. |
| Save Selected Values - Append | The ticked items, added to an existing value file | Add items to a value file you already have. |
| Partial Save All (Save Changed Values) | Every value that differs from stock | Carry all your changes to another copy of the same calibration. |
Save a value file
- For Save Selected Values, tick the items first.
- Choose the save command from the File menu.
- Check the folder before you save. The dialog opens in the last folder you used. Keep your own files outside the Value Files library.
- Type a file name and click Save.
The save dialogs list the type as Mako Value File (*.mvf), the same .mvf format.
Add items to an existing value file
- Tick the items you want to add.
- Choose File → Save Selected Values - Append. Its dialog is titled Save Selected Values.
- Select the existing value file and click Save.
- Windows asks whether to replace the file. Answer Yes. ADVX Editor adds the ticked items to the file and keeps the items already in it.
12. Compare two tunes
Compare Tunes lists every item that differs between two tunes, or between a tune and its stock values. Use it to see what a value file changed, or to review your changes before you save or send a tune.
Open the Compare panel
- Choose File → Compare Tunes, or click toolbar button 7. The Compare Tunes panel opens in the editor area, or below the editor if one is open.
- If the bottom row of controls isn't visible, drag the panel's bottom edge down.
- Choose the tunes in Tune 1 and Tune 2. Both list the open tunes. Tune 2 also offers Stock, the calibration's original values. With only one tune open, Compare starts with that tune against Stock.
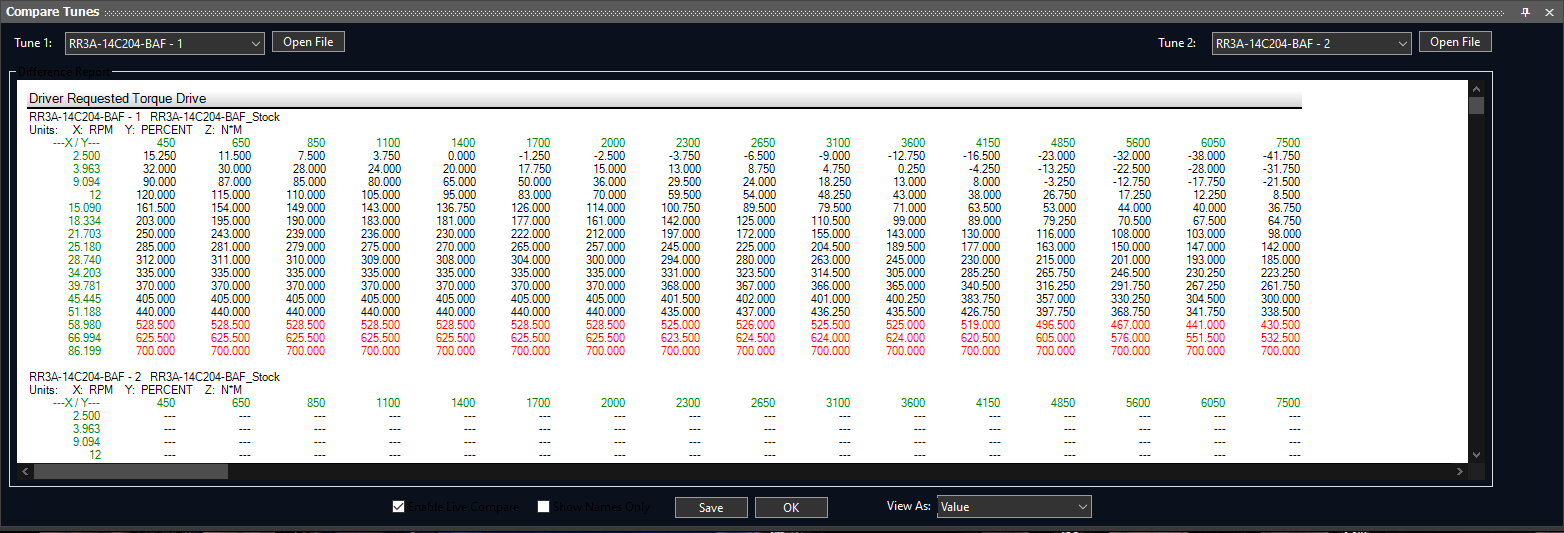 The Compare Tunes panel comparing two open tunes, with all its controls showing
Read the report
The Difference Report has one block per changed item, headed by the item's name.
- Tune 1's values come first, with the changed cells colored.
- Tune 2's values follow, with --- where a cell is the same in both tunes.
- Use the scroll bars to move through the report.
If the two tunes are identical, the report is blank. Before you read a blank report as "no differences", check that both Tune boxes are set.
Use the controls
| Control | What it does |
|---|---|
| Open File | Beside each Tune box. Loads a saved tune file (.atf) into that side without opening it in a tab. The report labels it New Tune. |
| Enable Live Compare | The left-hand box, ticked by default. The report updates as you edit. Untick it to freeze the report. |
| Show Names Only | The right-hand box. Lists only the names of the changed items. After you tick or untick it, re-pick Tune 2 to refresh the report. |
| View As | Value (the default), Percentage (the change in per cent), Difference (the gap between the two tunes) or ValueAndPercentage (the values, then the percentages, for each item). |
| Save | Saves the report as a Rich Text file (.rtf). Check the folder before you save. A full report can take several seconds; wait for the Export Complete! message. |
| OK | Closes the panel. |
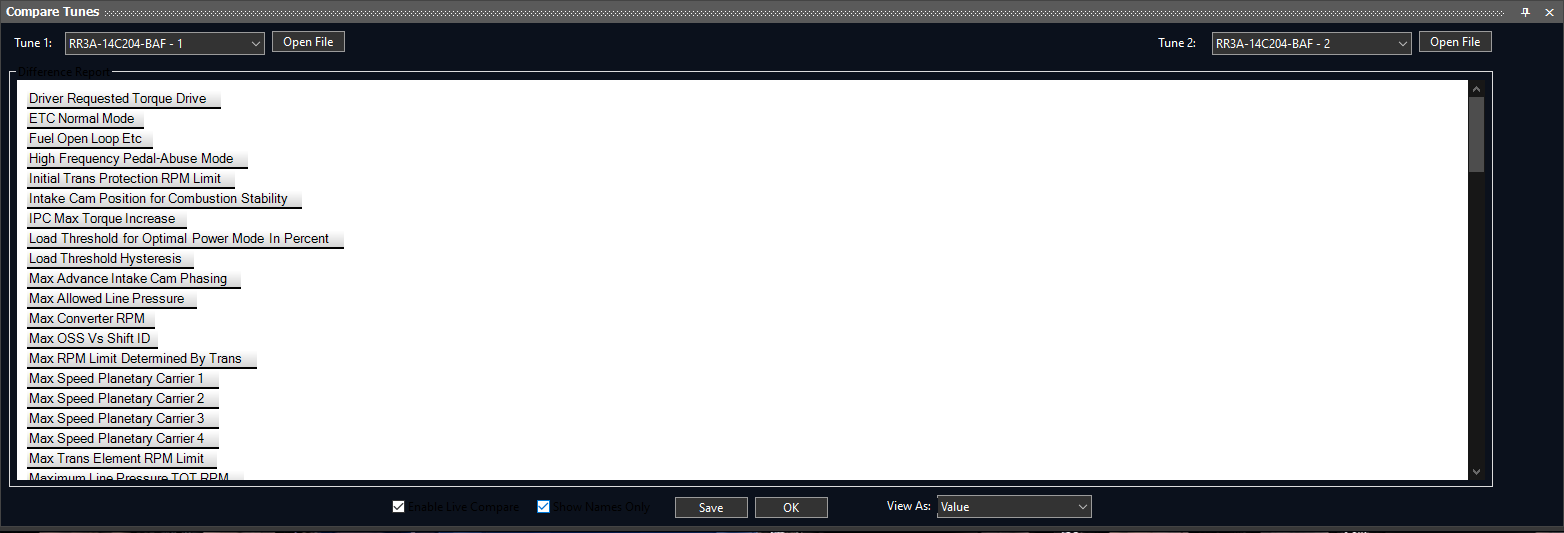 Show Names Only: the report lists the changed items by name
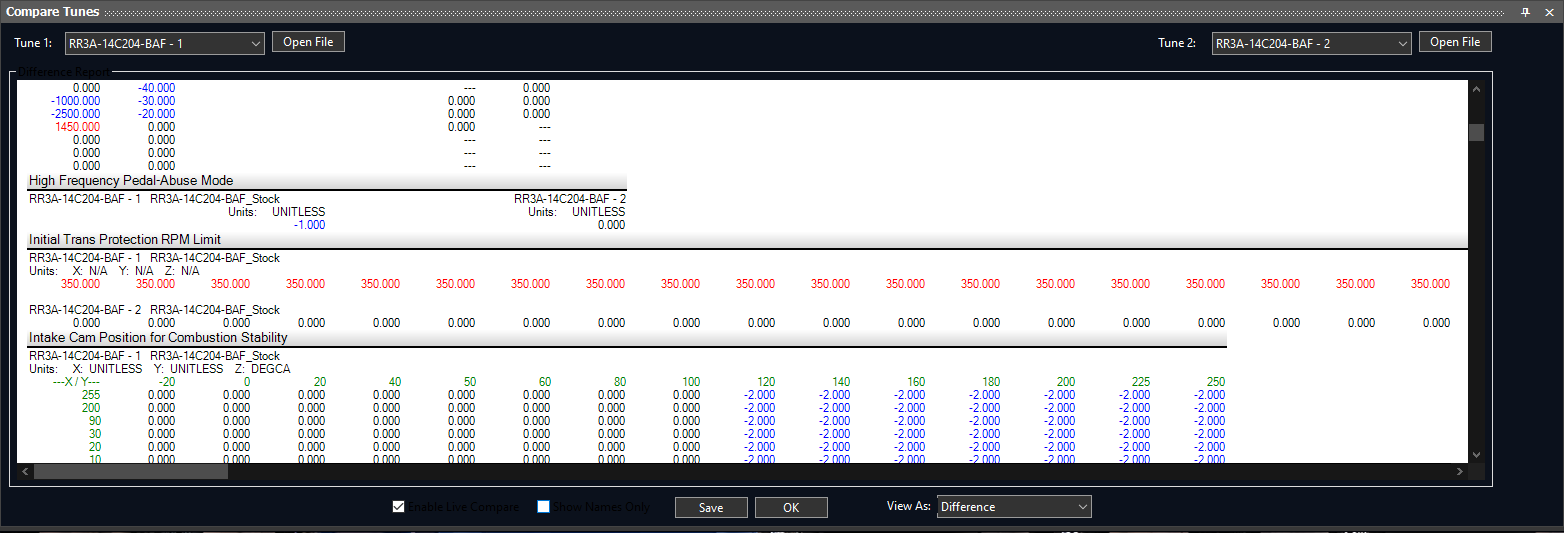 View As Difference: the gap between the two tunes, cell by cell
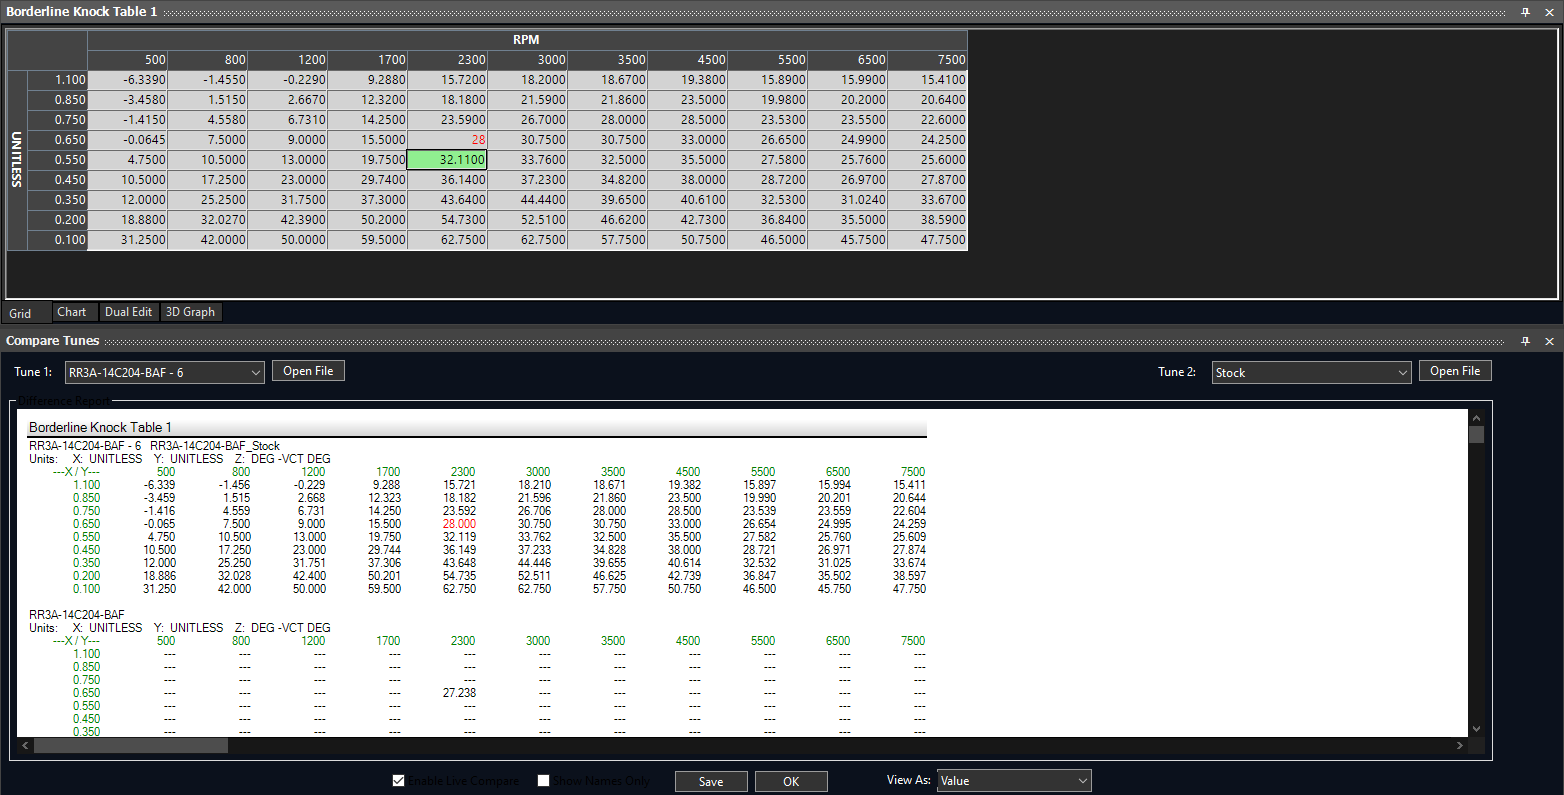 Compare below an open editor: the cell just changed in Borderline Knock Table 1 appears at the top of the report
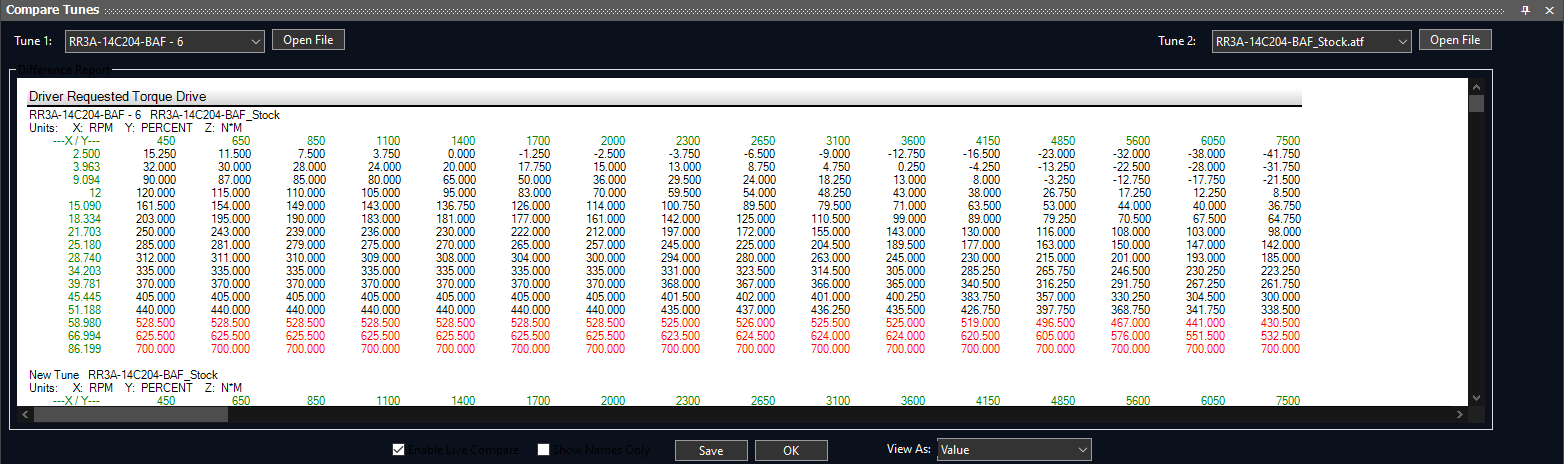 Tune 2 loaded with Open File, labelled New Tune in the report
13. Work with two tunes
Open both tunes first (see step 4). Each tune gets its own tab in the Tune View. You can open the same file twice, for example to keep a stock copy beside your working copy.
Dual Edit: two tunes side by side
- Open an item.
- Click the Dual Edit tab below the grid.
- Choose the other tune in the Tune 2 box at the top right.
The current tune (Tune 1) is on the left, and the tune you chose is on the right. Changed values are red or blue, as in the Grid tab. Use the scroll bars to move through the grids.
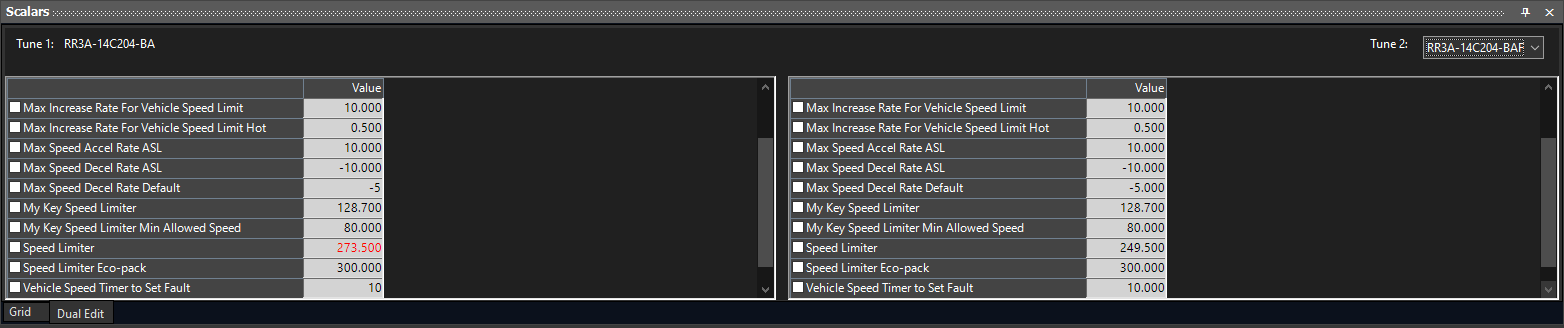 Dual Edit: the current tune on the left and the tune chosen in Tune 2 on the right; the changed Speed Limiter shows in red
Type changes in the left-hand grid. To change the other tune, switch to its tab.
Copy values from one tune to another
- Select the cells and press Ctrl+C.
- Click the other tune's tab in the Tune View and open the same item.
- Select the target cell and press Ctrl+V.
The pasted values turn red or blue against that tune's stock values. To take the paste back, press Ctrl+Z, or right-click and choose Reload to return the cells to stock.
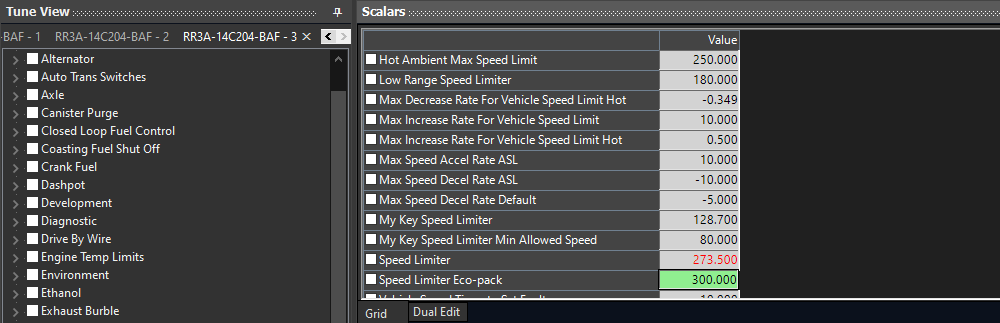 Speed Limiter pasted into another open tune, shown in red
Ctrl+C copies only the digits the grid shows. To keep full precision, use Edit → Copy and Edit → Paste instead (see step 8).
Move many changes at once
To carry all your changes to another copy of the same calibration:
- In the tune you changed, choose File → Partial Save All (Save Changed Values) (see step 11).
- Click the other tune's tab and choose File → Load All Values (see step 10).
- Check the result with Compare Tunes (see step 12).
ADVX Editor applies a value file to whatever tune is open, so check which tab is active before you load.
14. Tuning Tools
The Tuning Tools menu holds five calculators. The four Ford tools start with Select Tune, which lists the tunes you have open, so open your tune first (see step 4).
| Tool | Use it to | What you enter |
|---|---|---|
| Ford Speed Density Calculator | Work out speed-density values from a datalog | 1. Select Tune, 2. Select Log (Browse), 3. Select Weighting Factor, 4. Apply Calculation |
| Ford 10R OSS to Engine RPM Calculator | Relate 10R transmission output shaft speed (OSS) to engine RPM | 1. Select Tune, 2. Select Table |
| Ford Torque Spark Clip Bit Calculator | Read the torque-reduction spark clip options as a grid | 1. Select Tune, 2. Select Table |
| Tire Size Calculator | Work out a tire's diameter and revs per mile | Section Width, Aspect Ratio, Wheel Diameter |
| Ford Anti-Lag Drive Mode Calculator | Choose the drive modes the anti-lag works in | Select Tune, then tick the drive modes (Normal, Sport, Tow, 4x4L and others) |
The Speed Density, 10R OSS and Spark Clip Bit windows have a Download … Guide link at the top right. Use it for full instructions.
Before you press Apply Calculation, save your tune under a new name with Save Tune As (see step 18). Afterwards, check what changed with Compare Tunes against Stock (see step 12).
Ford Torque Spark Clip Bit Calculator
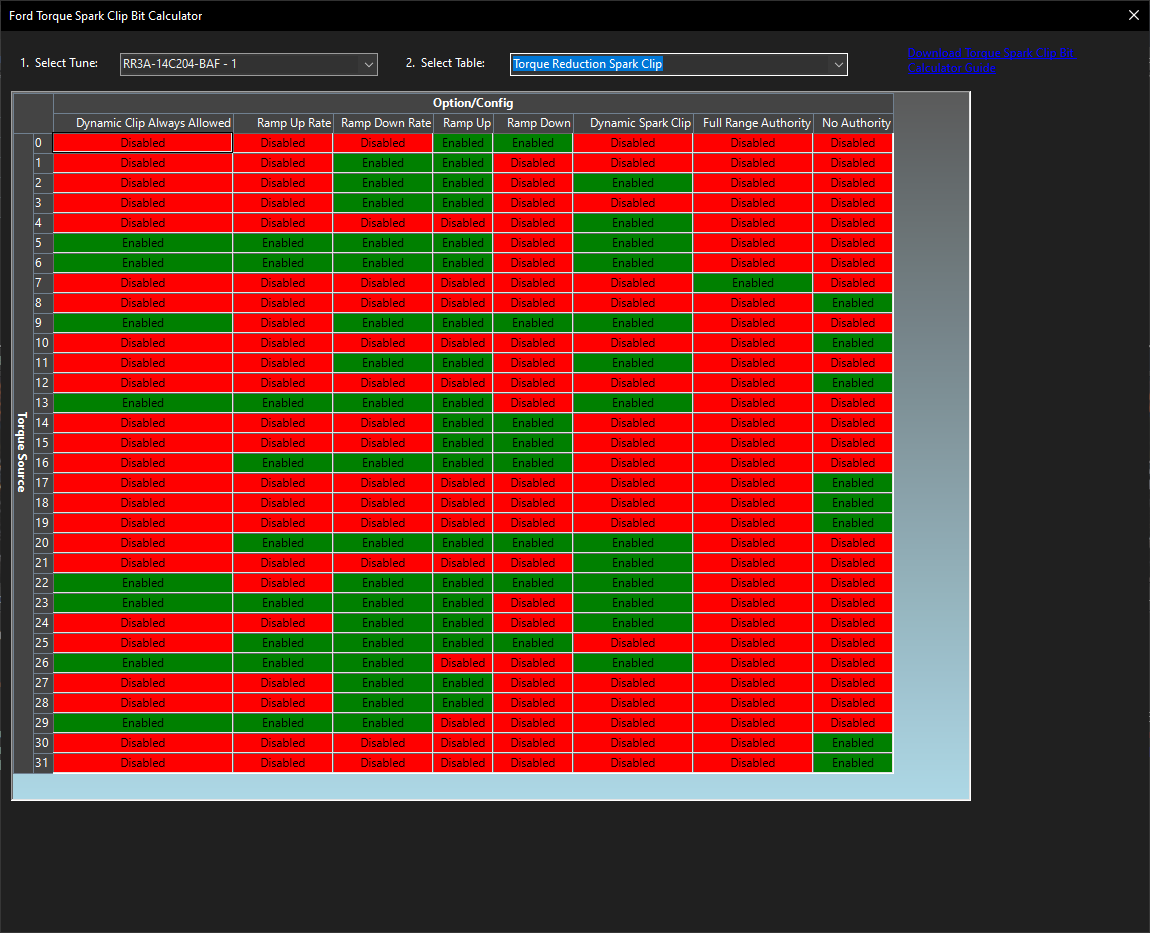 Ford Torque Spark Clip Bit Calculator showing the Torque Reduction Spark Clip table
- In 1. Select Tune, choose your tune.
- In 2. Select Table, choose Torque Reduction Spark Clip or Torque Reduction Spark Clip for Cvc.
Each row is a Torque Source, 0 to 31. Each column is an Option/Config: Dynamic Clip Always Allowed, Ramp Up Rate, Ramp Down Rate, Ramp Up, Ramp Down, Dynamic Spark Clip, Full Range Authority and No Authority. Green Enabled means the option is on for that torque source. Red Disabled means it is off.
Tire Size Calculator
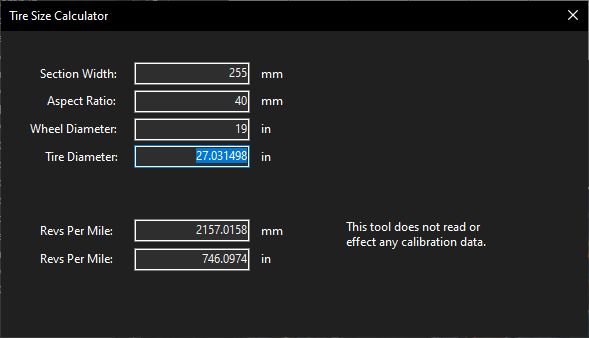 Tire Size Calculator with a 255/40R19 tire entered
Type the tire's Section Width, Aspect Ratio and Wheel Diameter. For a 255/40R19 tire, enter 255, 40 and 19. The calculator works out the tire's diameter and revs per mile. It does not read or change your calibration.
Coming from Advantage III? The Torque/Inverse calculator is not on this menu. It is now a tick setting in Tools → Options (see step 15).
15. Tools, Options and View
The Tools menu holds Options, Edit Customer Information, Add User Defined Parameters, Delete User Defined Parameters, PCMTec -> CEF, Ford File Builder and GM File Builder.
Options
Choose Tools → Options. The Options Dialog has three tabs: General, Directories and Cloud Settings. Press OK to keep your changes, or Cancel to close without changing anything.
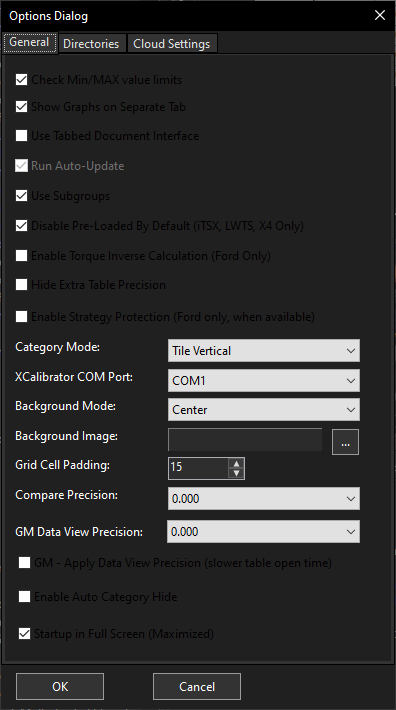 Options Dialog, General tab
Settings worth knowing on the General tab:
| Setting | Default | What it does |
|---|---|---|
| Check Min/MAX value limits | On | Leave it on. Always check each item's Minimum and Maximum in the Information panel, and keep your values inside that range (see step 6) |
| Compare Precision | 0.000 | Sets how small a difference Compare Tunes reports (see step 12) |
| Hide Extra Table Precision | Off | Tick it to show fewer decimal places in table grids |
| Use Tabbed Document Interface | Off | Off: one editor, and each item you open replaces the last one. On: each item opens on its own tab |
| Startup in Full Screen (Maximized) | On | Starts ADVX Editor maximized |
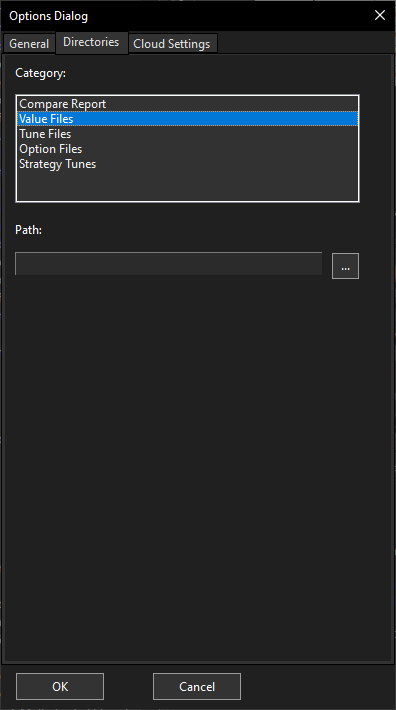 Options Dialog, Directories tab with Value Files selected
On the Directories tab, choose a Category (Compare Report, Value Files, Tune Files, Option Files or Strategy Tunes). Then type its folder in Path, or press ... to browse. These are the starting folders: Open Tune and Save Tune As start in Tune Files, and Load All Values starts in Value Files. After the first time, each dialog opens in the last folder you used. Check the folder before you save, and keep your own files outside the Value Files library.
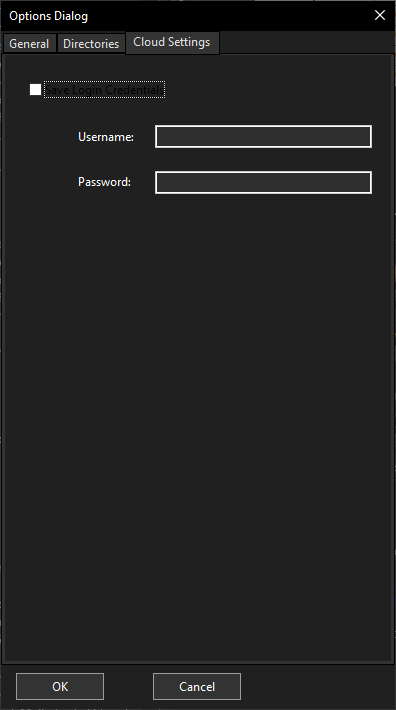 Options Dialog, Cloud Settings tab
The Cloud Settings tab holds your cloud login: Username, Password and a Save Login Credentials option, used when you send a tune through the cloud (see step 16).
Torque Inverse Calculation (Ford)
Ford tunes hold torque in matched pairs of tables under Torque Calculation → Individual Tables, for example Torque Table 1 and Torque Inverse Table 1:
- Torque Table: "the indicated flywheel newton meters for given load vs rpm" (unit N*M).
- Torque Inverse Table: "the direct inverse of the Torque Table", giving the load (UNITLESS) needed for each torque and RPM.
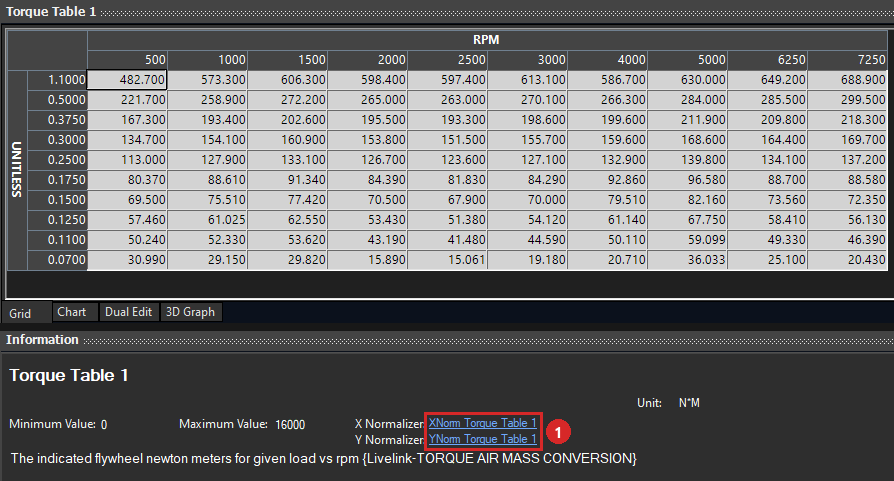 Torque Table 1, with its X and Y Normalizer links (1)
When Enable Torque Inverse Calculation (Ford Only) is on, ADVX Editor recalculates the Torque Inverse Table each time you change the matching Torque Table. You edit only the Torque Table.
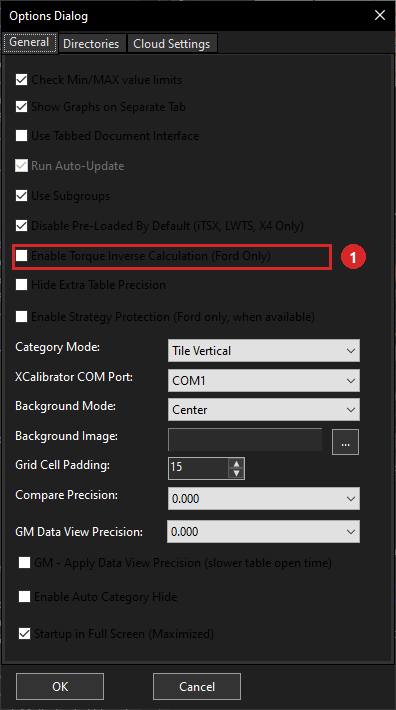 Options Dialog, General tab, with Enable Torque Inverse Calculation (Ford Only) (1)
- Choose Tools → Options. On the General tab, tick Enable Torque Inverse Calculation (Ford Only) (1) and press OK.
- Save your tune under a new name with Save Tune As (see step 18), and work on that copy.
- Open Torque Table 1 (use Find, see step 5). In the Information panel, follow the Y Normalizer link, YNorm Torque Table 1 (see step 6). This is the load axis. Its range must cover the values in Torque Inverse Table 1.
- Open Torque Inverse Table 1 and follow its Y Normalizer link, YNorm Torque Inverse Table 1. This is the torque axis. Its range must cover the values in Torque Table 1. (Both tables share the same X Normalizer, XNorm Torque Table 1, for RPM.)
- Set both Y normalizers to cover the torque and load you will work with (see step 9). Do this before you change any torque values, because the calculation uses both axes.
- Change the values in the Torque Table. The Torque Inverse Table follows automatically.
- Check the result. Open the Torque Inverse Table and look for red (higher) and blue (lower) values, or open Compare Tunes against Stock (see step 12) and check that both tables are listed.
With Use Tabbed Document Interface off, the editor shows one item at a time, so switch between the two tables in the Tune View tree.
Other Tools entries
| Entry | What it does |
|---|---|
| Edit Customer Information | Opens the same Customer Information box you see when you save with Save Tune As (see step 18). Enter the customer information for this tune: Name, Address, City, State, Zip Code and a Description of up to 3000 characters. All fields are optional. Press OK when you're done, or Esc to close the box |
| Add User Defined Parameters | Loads your own parameters from a .tcs file. Choose the manufacturer (Ford, DCX or Cummins), then press Browse + Add Custom Parameters File. Name the file with 5 digits that match an existing ECM/TCM strategy, plus .tcs. The dialog shows the file format and an example line |
| Delete User Defined Parameters | Enter the Processor Code, choose Delete Code from Database or Delete User Defined Data from Database, and press OK to delete, or Cancel to close. Check the code and your choice before you press OK |
| PCMTec -> CEF | Converts a PCMTEC file to a customer export file (.cef). Press Browse to select the file, enter a tune description and the device serial number, then press Convert to CEF |
| Ford File Builder | Builds a file from an ECM/PCM identifier and an optional TCM identifier, for non-production module configurations only. Enter the ECM/PCM Identifier and, if needed, the TCM Identifier (box code, 7-character strategy or SW part number), then press Save File. Each identifier must open in ADVX Editor on its own. If you need production ECM and TCM linking, contact Tech Support with the ECM and TCM you want linked. Files made with this tool may not be supported by Tech Support |
| GM File Builder | Opens GM File Manager, which builds a tune file from individual segment binaries. Enter the VIN, choose the Operating System, System, Fuel System, Speedometer, Engine Diagnostics and Engine Operation files, and press Save File |
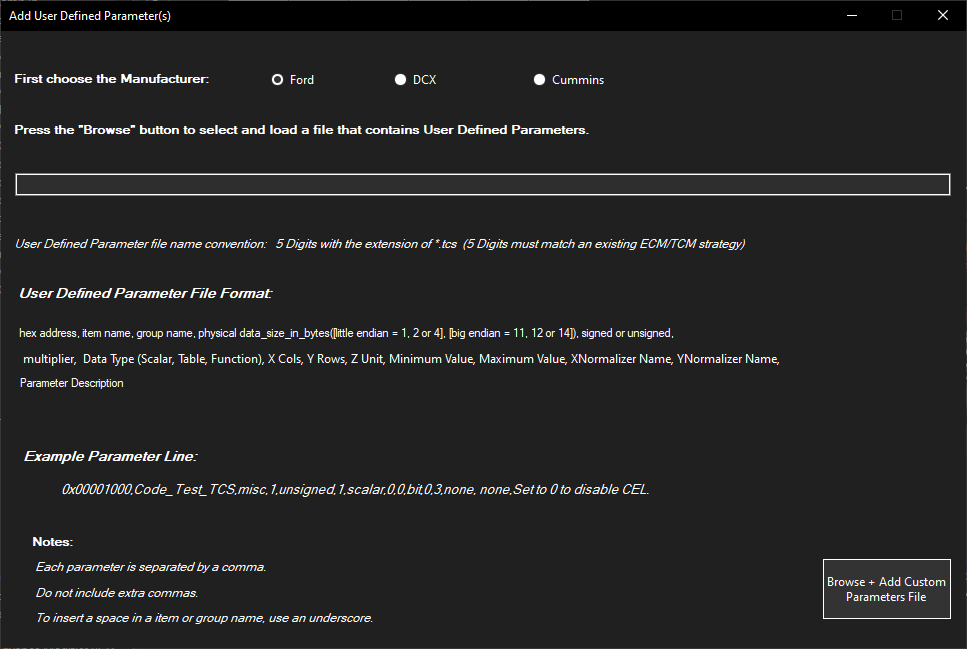 Add User Defined Parameter(s) dialog with the file format and an example line
View levels
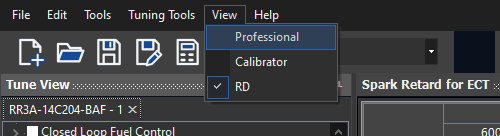 The View menu with RD ticked
View → Professional, Calibrator and RD are user levels set by your dongle. The tick shows the level you have.
Report a problem
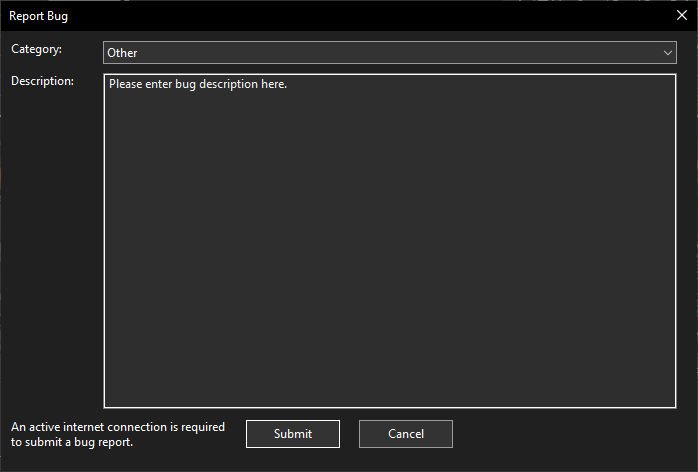 The Report Bug dialog
Choose Help → Report Bug. Pick a Category (Other, Tuning or User Interface), describe the problem in Description, and press Submit. Say what you were doing, what you expected and what happened. You need an active internet connection to submit a report. Press Cancel to close without sending.
16. Send a tune to a customer
When you tune remotely, you can deliver a finished tune in these ways:
| Method | Menu or button | Customer's device |
|---|---|---|
| E-mail a customer export file (.cef) | File → Export Customer File for Email | X2, X3, LW, X4, or BDX |
| Export a file for a Bully Dog GT | File → Export Customer File for Bully Dog GT | Bully Dog GT |
| Send it through ADVX Editor Cloud | File → Upload Customer File to Cloud, or Upload To Cloud (button 21) | SCT/BullyDog BDX or GTX |
Before you send a tune, save your own copy with Save Tune As (step 18) and review your changes with Compare against Stock (step 12). Have your customer's device serial number ready. Each of these methods asks for it.
E-mail a customer export file
A customer export file is locked to one device. Only the X2, X3, LW, X4 or BDX device with the serial number you enter can load it.
- Open the finished tune and choose File → Export Customer File for Email. The Choose Customer Export File for Email window lists the steps along the top: Choose File Name, Enter Serial Number, Choose Options, Click Export.
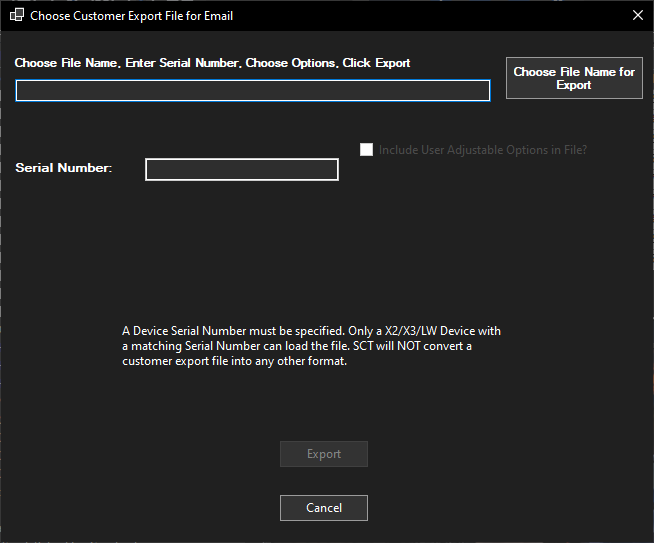 The Choose Customer Export File for Email window
- Press Choose File Name for Export. In the File Selection window, choose a folder, type a name your customer will recognize, and press Save. The type is Customer Export File for Email (*.cef). The suggested name is the calibration identifier followed by "export", and the window opens in the last folder you used, so check the folder.
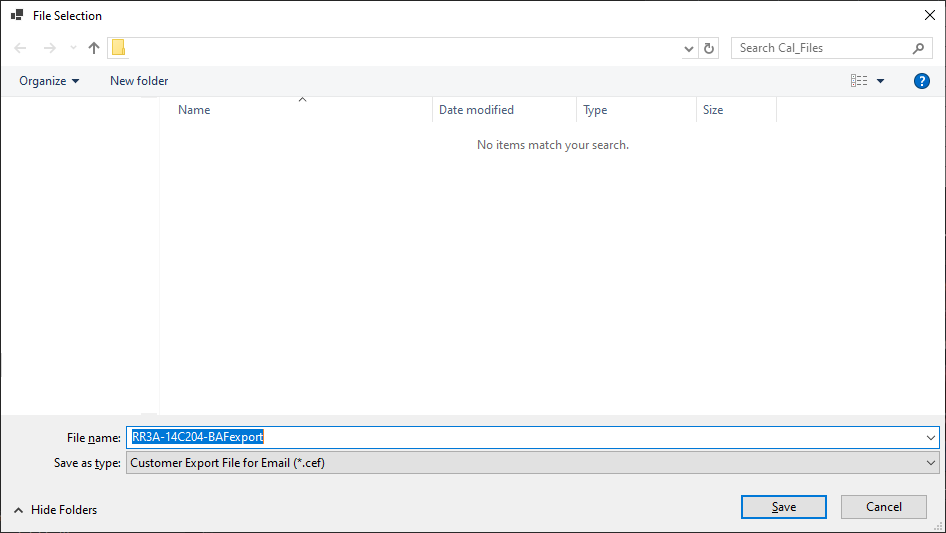 Choosing a folder and file name for the .cef file
- Serial Number, the options box and Export become available after you choose the file name, and the file's path shows under the steps. Type the Serial Number of your customer's device.
- Optional: tick Include User Adjustable Options in File?to let your customer adjust some settings on the device.
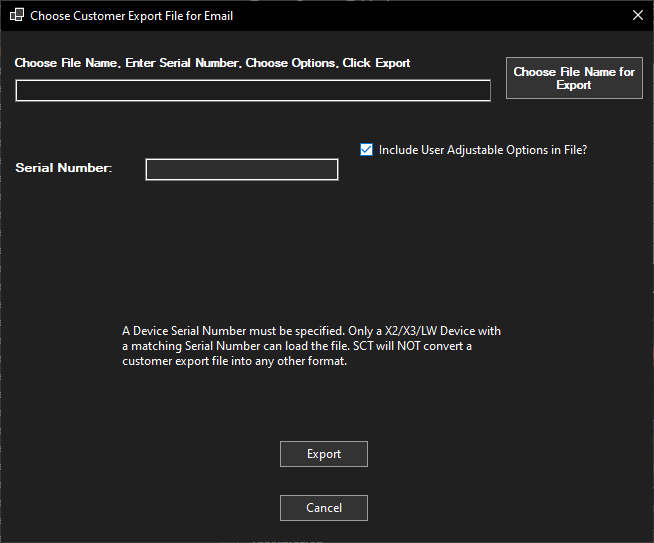 The export window after a file name is chosen: Serial Number, the options box and Export are available, and Include User Adjustable Options in File? is ticked
- Press Export. If you ticked the user options, choose the options to offer and their Min and Max limits in the window that follows.
- E-mail the .cef file to your customer.
SCT will not convert a customer export file into any other format, so keep your own tune file (.atf) for future changes. To close the window without exporting, press Cancel.
Export a file for a Bully Dog GT
- Choose File → Export Customer File for Bully Dog GT.
- In the Export Bully Dog Custom Tune window, type the Serial Number of your customer's Bully Dog GT and a Description of the tune.
- Press Export File for Bully Dog GT.
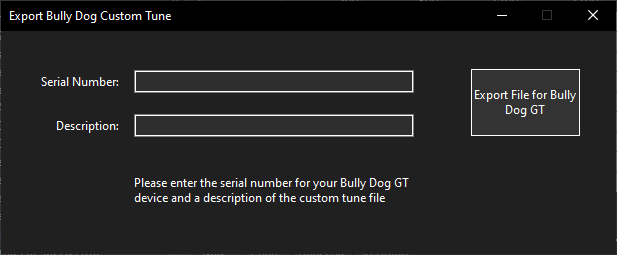 The Export Bully Dog Custom Tune window
To close the window without exporting, use the X in its title bar.
For a powersports tune, use File → Export Customer File for Bully Dog Powersports.
Send a tune through ADVX Editor Cloud
ADVX Editor Cloud sends the tune straight to your customer's Bully Dog BDX or GTX device, with no file to e-mail. You need a cloud account and an internet connection. Your login is kept under Tools → Options → Cloud Settings (step 15).
Choose File → Upload Customer File to Cloud, or press Upload To Cloud (button 21). Both open the ADVX Editor Cloud window.
To send one tune, use the Quick Tune tab.
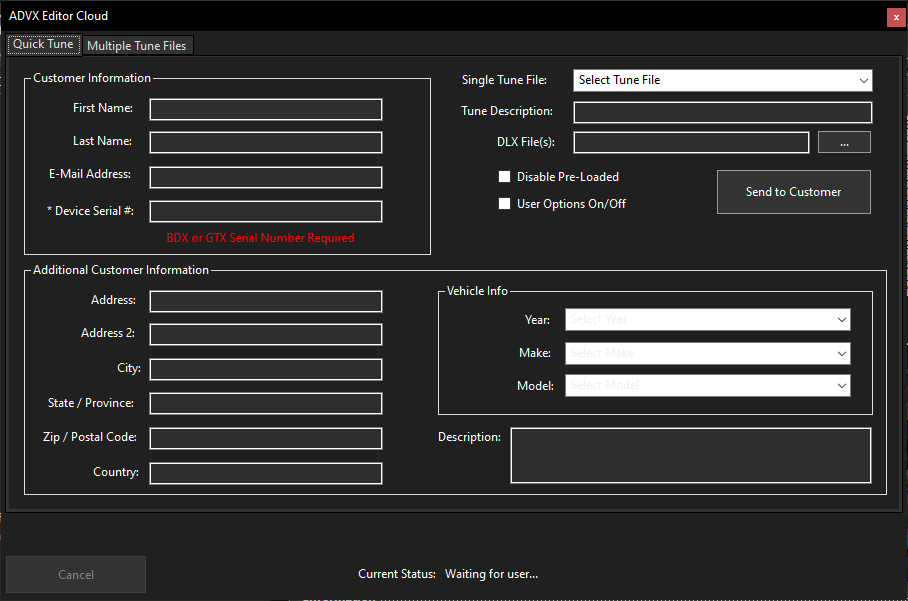 The Quick Tune tab of the ADVX Editor Cloud window
- Fill in every field marked *. The only one is Device Serial #, the serial number of your customer's BDX or GTX device. All other fields are optional: First Name, Last Name, E-Mail Address, Additional Customer Information, Vehicle Info (Year, Make, Model) and Description.
- Choose the tune under Single Tune File and type a Tune Description.
- Optional: to add DLX files, press the … button next to DLX File(s).
- Optional: tick Disable Pre-Loaded to hide the tunes built into the device, and User Options On/Off to let your customer adjust some settings.
- Press Send to Customer. Current Status at the bottom of the window shows Waiting for user… until you send.
To send several tunes, use the Multiple Tune Files tab.
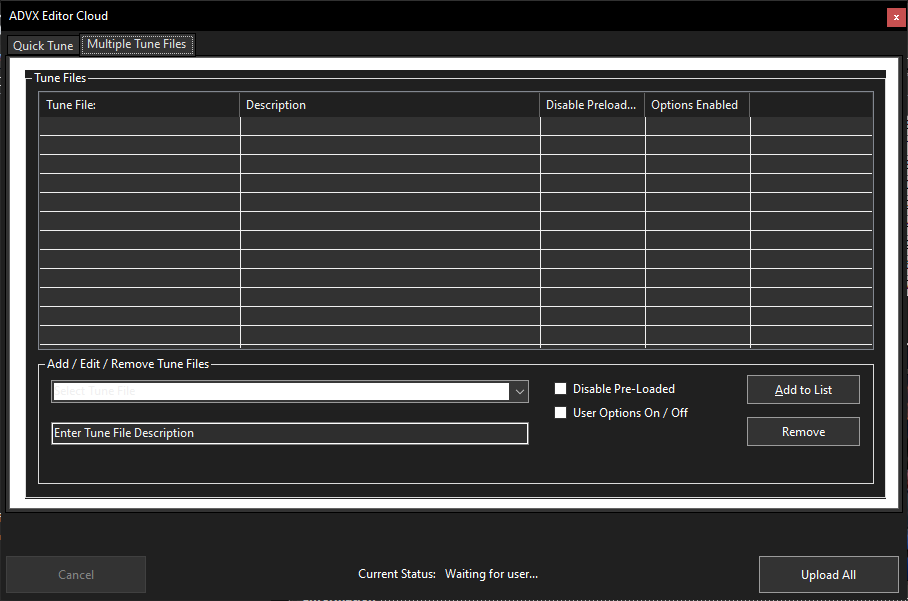 The Multiple Tune Files tab of the ADVX Editor Cloud window
- Choose a tune from the Select Tune File list and type its description in Enter Tune File Description.
- Tick Disable Pre-Loaded and User Options On / Off as needed, then press Add to List. The tune appears in the Tune Files list with its description and options.
- Repeat for each tune. To take a tune off the list, select it and press Remove.
- Press Upload All.
To close the cloud window without sending, use the ✕ in its title bar. If the window cannot load vehicle data, the Year, Make and Model lists stay empty; check your internet connection.
17. Program a device
The device buttons sit at the right-hand end of the toolbar (step 3): Program Device (button 20), next to Upload To Cloud (button 21) and Direct Flash (button 22).
Program Device
Program Device (button 20) programs a connected SCT device. Connect the device to the PC first, then press the button. If ADVX Editor finds no device, it tells you so:
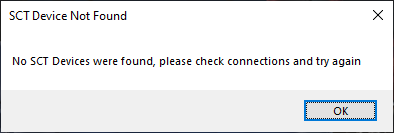 The SCT Device Not Found message
Press OK, check the device's connection and try again.
Direct Flash
Direct Flash (button 22) flashes the vehicle through your connected device and connected vehicle.
- Press Direct Flash. A message asks you to connect your device and turn the vehicle's key to the ON position. Do both, then press OK.
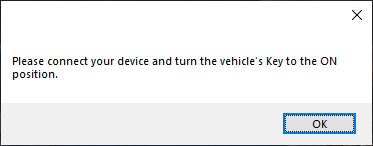 The message asking you to connect your device and turn the key to ON
- The NXG Direct Flash window opens. DEVICE INFO shows your device's Model, Serial and Firmware. VEHICLE INFO shows the vehicle's VIN, Strategy and SW Part Number.
- Choose an action:
| Button | Use it to |
|---|---|
| Direct Flash | Write the tune to the vehicle |
| Return to Stock | Put the vehicle's stock calibration back |
| Load Support File | Load a support file for the vehicle |
| Recovery Flash | Recover the vehicle's computer after a flash that did not finish |
| Close | Close the window |
Keep the device connected and the key ON until a flash has finished.
With no device connected, the fields are empty and the buttons are unavailable. Close the window with the X in its title bar.
18. Save and close
Save Tune or Save Tune As
| Command | What it does |
|---|---|
| Save Tune (button 3, or File → Save Tune) | Saves your changes into the tune's current file (the one named in the title bar), replacing it. A tune that has never been saved asks for a file name first |
| Save Tune As (button 4, or File → Save Tune As) | Saves a new copy under a name and folder you choose. The file you opened stays as it was |
Always use Save Tune As the first time you save a tune that started as a stock file.
- Choose Save Tune As. The dialog opens in the last folder you used, so check the folder first. Type a new name and press Save. Tunes save as ADVX Editor Tune File (*.atf).
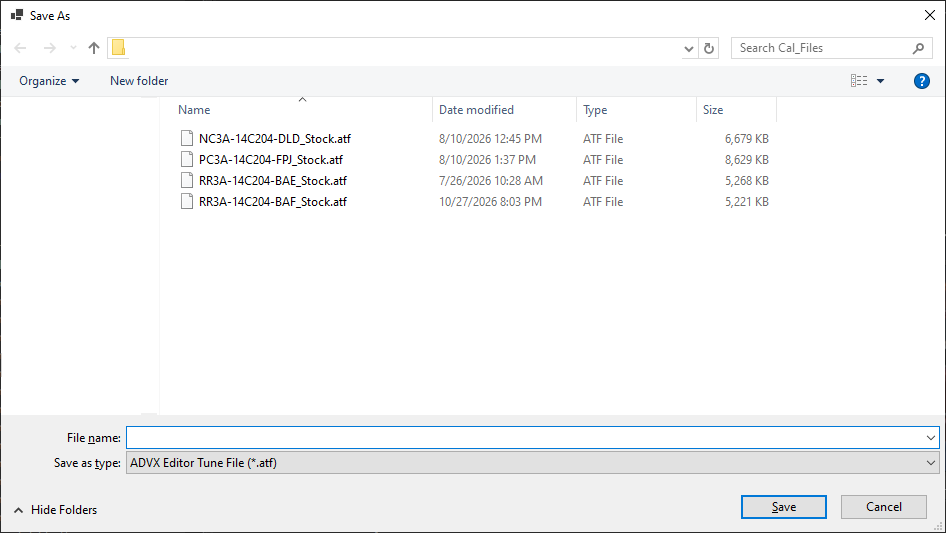 The Save As dialog for a tune file
- The Customer Information box opens. Type the customer's Name, Address, City, State, Zip Code and a Description (up to 3000 characters), or leave it blank for your own tune. All fields are optional. Press OK.
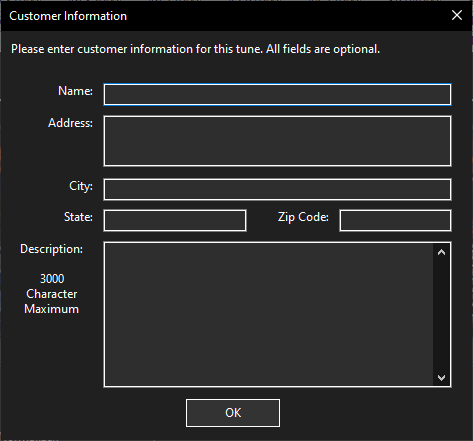 The Customer Information box
- ADVX Editor saves the tune. The title bar now shows the new file's path; the tab keeps its name.
To change the customer details later, use Tools → Edit Customer Information.
A saved tune keeps the calibration's stock values and its History. When you reopen it, your changes still show red or blue against stock, and the History tab lists them.
Before you save, check that your values are inside each item's Minimum and Maximum (step 6), and review your changes with Compare against Stock (step 12).
Close a tune
Choose File → Close Tune. A Confirm box asks whether you are sure. Press Yes to go on.
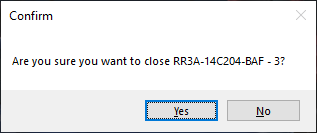 The Confirm box that asks whether to close the tune
If the tune has unsaved changes, a second box asks whether to save it before closing:
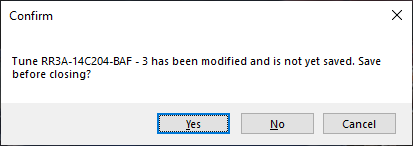 The box that asks whether to save a changed tune before closing
- Yes saves the tune, then closes it.
- No closes the tune without saving your changes.
- Cancel keeps the tune open.
If the tune came straight from a stock file, press Cancel and save a copy with Save Tune As first. The box still appears after you undo your changes with Ctrl+Z.
Close all tunes
File → Close All Tunes closes every open tune at once. Save any tune you want to keep first.
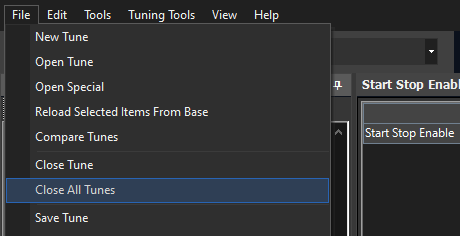 Close All Tunes on the File menu
Exit
File → Exit closes ADVX Editor. If a tune has unsaved changes, the same Yes / No / Cancel box asks whether to save it. Tunes without unsaved changes close without a question. Wait until the ADVX Editor window has closed completely before you start it again.
19. Tips and troubleshooting
Good habits
- Save a copy with Save Tune As before you change a stock tune (step 18).
- To select a block, press on the first cell and drag in one movement (step 8).
- Keep values inside the Minimum and Maximum shown in the Information panel (step 6).
- Load only value files made for your vehicle and calibration, then check the result (step 10).
- Check the folder in every save dialog, and keep your own files outside the Value Files library (step 11).
- Compare against Stock before you save or send a tune (steps 12 and 16).
- Save every tune you want to keep before you use Close All Tunes (step 18).
If something isn't right
| What you see | What to do |
|---|---|
| A value did not change as you expected, or values look wrong | Compare the tune against Stock to list every change (step 12). To put values back exactly as stock, select them and use right-click → Reload (step 8) |
| After a click and a drag, several cells hold the same value | Select the cells and use right-click → Reload (step 8). Next time, press on the first cell and drag in one movement |
| You want values back exactly as stock | Select them and use right-click → Reload. Ctrl+Z undoes the last change (step 8) |
| A value is outside the item's range | Check the Minimum and Maximum in the Information panel (step 6). Type a value inside that range, or use right-click → Reload |
| You loaded a value file and cannot see what changed | Look for red and blue values, check the History tab, or Compare against Stock (steps 6, 10 and 12) |
| A click in a grid does not select the cell | Click again. The first click may only move focus to the grid |
| The Compare panel's bottom row of controls is not visible | Drag the panel's bottom edge down (step 12) |
| The Compare report is blank | The two tunes have no differences. Check that both Tune 1 and Tune 2 are set (step 12) |
| Show Names Only did not change the report | Choose Tune 2 again (step 12) |
| The Find Item box cannot find an item | Type the item's full name, or use Edit → Find (Ctrl+F), which finds partial names (step 5) |
| The editor's title names a different item | Go by the tree selection and the Information panel (step 7) |
| The editor disappeared and left a tab at the top | Click the tab, then click the pin to dock the editor again (step 7) |
| You want to change the other tune in Dual Edit | Type changes in the left-hand grid. To change the other tune, switch to its tab (step 13) |
| A save dialog opens in an unexpected folder | Save dialogs open in the last folder used. Browse to your own folder before you press Save (step 11) |
| Every tune closed at once | Close All Tunes closes every open tune. Reopen saved tunes from File → Recent Files (step 4) |
| Professional or Calibrator cannot be chosen in the View menu | Professional, Calibrator and RD are user levels set by your dongle (step 15) |
| SCT Device Not Found | Connect your SCT device, check the connection and try again (step 17) |
| The cloud window cannot load vehicle data | Check your internet connection (step 16) |
| A window has no Cancel button, or its Close button is unavailable | Close the window with the X in its title bar |
| An unexpected message appears | Press OK, then report it with Help → Report Bug (below) |
Report a problem
Choose Help → Report Bug. Pick a Category (Other, Tuning or User Interface). In Description, say what you were doing, what you expected and what happened, and include the text of any message. Press Submit. You need an active internet connection to submit a report.